Thursday, December 27, 2012

Bridle Party!

My friend Christy gave me a lovely Christmas gift: a show bridle with silver accents. She no longer rides, and  so she passed this bridle --practically brand new! -- on to me.

I got spurs, too!

The pale color of it (called "Light Oil") has been very trendy in the past few years and usually is natural undyed leather. This bridle, however, had been coated with a paint-like finish of this pale color.

Light oil tack can look very pretty on the right color horse, but my Imp is a dark bay and I felt the contrast of a pale bridle would make his head look funny. Also, my saddle is a dark oil (dark brown) and so they wouldn't match. Finally, the pretty silver accents were not very noticeable against the light leather. 

Is this starting to sound like a project? Because, yep -- that's what I was thinking, too! And so I bought a bottle of leather dye at the tack shop. 

I bought "Dark Brown", but this picture shows the black kind. 
I asked them what sort of prep work I would have to do before using the dye, and the girl said that their tack repair guy uses acetone to remove previous finishes.  "You mean like nail polish remover?" I asked. 

Yep! Cheap nail polish remover. Some of the fancier brands are non-acetone, because acetone is stinky and extremely flammable, but the store brand I keep around for removing labels and paint and other small jobs was full of acetone and perfect. After scrubbing away about two inches of the finish, which took about half an hour, numbed my fingers, and made everyone a little dizzy with the fumes, I decided to see what kind of result I would get from just putting the dye on without taking the old finish off first. 

You know, it worked pretty darn well. I had to use a few more coats than I probably would have had to if I'd taken the finish off first, but it saved hours of time and looks just fine. More than likely, I'll have to touch up now and then, but I have half a bottle of the dye left so that's not a problem. 

Here's the after picture. I think the silver really pops now, and the dark color will look terrific on Imp. I'll try to remember to get a picture of him in it to share here.


Wednesday, December 26, 2012

Perf-ection!

Remember a week or two ago when I linked that video of JourneyQuest and said I'd explain later? Now that the gift involved has been presented to its recipient, I can finally post pictures here and show you what I made.

This is my friend Christian Doyle, who portrays "Perf", the professional adventuring wizard part of the cast of the show JourneyQuest. It was my husband Dave's idea to create a doll of Perf --a cuddly "action figure", if you will -- and present it to Christian for Christmas.

I was convinced that I had no yellow fabric, that there was nothing the right shade for a doll body, that making the hat would be difficult. I opened the drawers of my stash and there, sitting right on top, was the exact shade of yellow I needed for the robe, a paler piece for the hooded tabard, and some peach linen just right for the body. The next drawer held brown leather for belt, boots, and the hat trim, and a piece of chamois that when wetted, shaped, and dried formed the hat perfectly. It was easy and fun, and I didn't have to make any trips to the fabric shop to buy anything!  Dave made the sword, and in a final bit of inspiration, I added a squeaker so that Perf would utter a frightened "Eeep!" when squeezed.


I think he turned out rather well, and when Christian posted this pic of Facebook, we learned that 58 other people liked it too!

Here they are together, for a side-by-side comparison.  If you took Wee Perf's hat off, you'd see he has the same scruffy hair as his larger human counterpart.


Awwwwwwww...  I know, right? Too cute!

Steampunk Corsetry

Did everyone have a super Christmas/Hanukkah/Yule/Festivus/other December holiday occurrence? I did!

I was especially pleased to finish my trial corset in time to wear it to a few parties. I learned a few things about corsetry at the same time. For example, when they say "Boots first, then corset" they're not kidding. I had to have Dave tie my shoes! And that it's really best to believe yourself when you take measurements. 

When I drafted my corset pattern, my waist to hip measurement was something like three inches. (I have a really short torso; my height is all in the legs.) I compared that to the six inches that the sample pattern showed and thought I must have measured wrong. Thinking that perhaps it would be nice to have a little more length on the hip to really smooth my figure, I added a few inches. 


I used a brown wool for the front and sides, and a brown satin for the back panels, to give the look of a vest. I used interfacing to bond the fashion fabric to the brown duck cloth I used for the lining, which reduced fraying significantly and  made sewing the panels together much easier.  I got that idea from Cathrin Åhlén's corset-sewing tutorial . That girl is one smart cookie! 

Cotton duckcloth lining. Sturdy, inexpensive, and kind of boring. 

The fun side! 
I stitched three channels of boning into the front panel instead of using a busk. Next time I think I will use a busk to make it easier to put on/take off, but this worked out fine and really, it is just a practice corset.  I used 1/4" cable ties for boning, and along with the seams, that makes for a fairly supportive garment. Steel boning would be fantastic but I'll save that for when I'm making a really professional model. 

Seal brown half-inch double-fold bias tape finished the top and bottom, and I set in eleven grommets on either side of the back panels, and then I laced it up and took it for a test drive.

It's hard to take a good picture of oneself. Plus the lighting was an issue.
You see what the problem is there? Yeah. It's about three inches too long at the bottom. 

My dog can shoot lasers from her eyes.
We were heading out to a party that night, so there was no time for me to reshape the bottom line. I wore it as it was and decided I'd just not sit down. Who needs to sit down at a holiday cocktail party, right? Turns out it was a dinner party and chairs were kind of a big part of the experience. I discovered the cable ties allowed me to fold the bottom up a bit, thus preventing the topline from rocketing up and forcing my boobs into my neck, but like I said at the beginning -- lesson learned! This is why making a practice garment is an important step, and trusting your measurements, even if they aren't the same as somebody else's.

Oh, and the parrot?  That's Mossberg. He's animatronic, kind of hilarious (the fez was my own touch of fancy) and was only $5 at a thrift shop. Want one of your own? Try Amazon. 

Sunday, December 16, 2012

Ta-Dah!

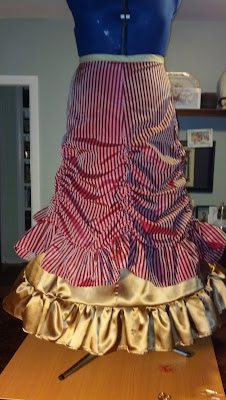
All righty, the skirt is done. Imogene the Dress Dummy is standing on the dining room table, all tarted up while the reed boning I ran through the bottom of the underskirt learns to behave properly. Here's the best pic I can take with our funky nighttime lighting and a flash.


I used bias tape to make the waistband. The bias tape is pale green. I mean, how cheesy is that -- it's like I didn't even try to make it match anything at all. Oh, wait -- I didn't. It's going to be hidden under the corset anyway, so it doesn't really matter, and this is the sort of decision-making ability I have at 11 pm after sewing all evening. Like, none. None decision-making ability.

I think I should head to bed. *yawn* G'night!

UPDATE!

I felt I should add a few notes on construction. I followed the method used on the original pretty closely, though I did flat-felled seams instead of using a serger, pressing the seams open, and then running stitching down either side to make two channels.  Because this left me with only one seam channel for my drawstrings to lift the skirt, I simply ran the cord up in the seam as far as I wanted, then brought it through the fabric, went back through the fabric into the seam channel again, and ran the cord back down -- pretty easy, and it works just fine.

I don't own any crinolines or a hoopskirt and I wasn't really in the mood to make one at this time.  That satin material frays like crazy, with fine hairy frizz that I wanted to keep under control, but I didn't want to lose a whole lot of width by turning even more seams.  I solved both these problems by covering the raw edges of my ruffle/skirt with a fold of bias tape before stitching them together.


(I also added a layer of burgundy taffeta to the ruffle to give it more body and a touch of fancy!)  The bias tape controlled the fraying and left a nice finish while also providing a channel, which I ran a few feet of reed into, basically making the underskirt into a hoopskirt. I'm not sure I'll stay with the reed -- it would make car travel an adventure -- and my second choice is aquarium tubing, which I have around here somewhere but can't find at the moment. The nice thing about aquarium tubing is that it will give the shape you want but has a little more flexibility so you can make it through narrow doors or get in a car.

I got my corset pattern pieces made and cut out, so I'll be working on my first practice run of that next. Hopefully it will turn out nice enough that I'll have two corsets: one brown twill for "everyday" wear and one to match this posh skirt. Stay tuned!

Ahem...

The reason why will be apparent later on, but for now, I'd just like to direct you all to the very amusing series  that some of my friends have been doing for your entertainment for a while now.


It's really good, you guys. If you've ever enjoyed the geeky thrill of Dungeons & Dragons, or played Warcraft-type games, or enjoyed The Guild, then you'll like this.

I'll give you a week or two to watch all the episodes, and then come on back here to share why this is important. (Besides the fact that it's awesome!)

Almost Famous!

One of our local theatre groups, Prodigal Sun, did a holiday production including a play called "Yes, Yes, No, No: The-Solace-of-Solstice, Apogee/Perigee, Bestial/Celestial Holiday Show". Dave was one of the main performers, and three days before opening night he came home with a plastic bag containing knit hats sodden with glue and a handful of sticky cotton balls.

"Can you make sheep ears for us? The cotton balls aren't working out."

Can I make ears? I laugh at ears! Ears are what I do best! I can make ears in my sleep!  I whipped out some white felt and pink fleece scraps I had left over from other projects, threw the glue-y hats in the wash, and fired up Sally the Sewing Machine. Half an hour later, I had this:


I thought they were adorable!

When I went to see the show on Friday night, I found I'd been included in the program's "Special Thanks" section.


Look!! They even linked my blog!
The best part was when the actors whipped out the hats and put them on, and I got to hear the whole audience collectively go "Awwwwww!" and die with cuteness. Those sheep really stole the whole show, and that's not something one can do with cotton balls glued to one's head.


Monday, December 10, 2012

Stripey goodness!

I've got the skirt panels put together, and the zipper in. It's the first zipper I've ever installed, and it's not as tidy a job as I'd like, but it'll be covered by a corselet so I'm not gonna sweat it. There's no proper waistband yet and I still need to work and attach the ruffle, but I tried it on and did a little prance around the living room anyway, just because I'm so pleased and excited about it. Here's a pic of it folded on the tabletop:

There's one seam unfinished in this pic, but I assure you, all my seams are properly flat-felled and fray-free.

Truly dazzling, and the way the stripes chevron together at the seams makes me happy, happy, happy.

And because I mentioned her by name in my previous blog, here's a snap of Sally, my old workhorse of a stitcher:


If you could see the back of her carry-cover, you'd see the price tag still there from when I picked her up last year from Goodwill -- $7.99. She's an English-made Singer, and has her little quirks -- like how there's only one bobbin in the world that she will function with, so I have to unwind and reload it with every color change, and how using heavy-duty thread makes her bind up every few minutes -- but we have an understanding and she gets the job done. Dave has offered many time to buy me a nice new machine, but for the amount of machine sewing I do, there's no reason to spend the money. (I'd rather have new tires for my car! haha) And I kind of like the weird retro color and the personality that comes with these old stitchers.

Okay, I gotta get back to the ruffle. LoTR is playing in the other room and I can't miss the dragon fireworks!

Saturday, December 8, 2012

Candybox!

I guess it was a year or more ago that I told y'all about my score of nine yards of pink and brown striped taffeta, and how I wanted to make a Victorian bustle dress out of it. Well, my recent foray into the world of Steampunk has provided me with a super reason -- and desire!-- to pull that yardage out and get busy.

I'm not holding myself to strict authentic period style and pattern this time; I'm really just in it to have some fun and make myself a froofy-poofy candybox of an outfit. 

For a pattern, I'm using instructions written by Cathrin on her blog "learning to fly".  Her hand-drawn step-by-step notes look an awful lot like the sort of stuff I fill my notebooks with, so I immediately felt at ease with her project. 

Here's a pic of the skirt Cathrin made.
Mine will be much more colorful! 

The panel seams on the overskirt have drawstrings in them! Isn't that fun? I like the idea of being able to adjust the amount of poof in my overskirt, and the construction method is very familiar -- except that I'll be machine sewing this skirt, not hand sewing.

I'm a little spooked by that, I'll admit.  Hand sewing allows one a great deal of control. Machine sewing goes so fast, it's easy for me to make a mistake and then it's such a hassle to rip out the stitching. If I didn't want to wear the dress for New Year's, I'd probably just work it up by hand. 

Here's a look at the fabric I'm working with: the pink and brown will be the overskirt, and then I wanted a different look for the underskirt. I chose an antique gold taffeta. 


Gosh, the pic makes that gold look very washed out. It's such a lovely warm tone, really -- like caramel!  I originally thought a dark brown would be better, but the stripe is really more of a burgundy and when I tried to match it, the dark brown just looked blah and a matching burgundy made me think of barbershop quartets. For a while I carried a bolt of pale green floral damask around, and I'm still wondering if I shouldn't have gotten a few yards of that, too -- it was so unexpected;  pretty and fresh with the stripes! I have plenty of the pink stripe left, so maybe I'll make another skirt with the green for spring or something. I decided on the gold because it went nicely with the stripe, fit in with my "candybox" idea, and was on sale. (I got almost three yards for ten bucks!) Also, when I make a corset/wide belt/cincher for this outfit, I can use leftover gold fabric to bring it all together. 

I got all the skirt panels cut out tonight. My directions say to zig-zag or serge the edges to prevent fraying, but I think I'll just do proper flat-felled seams; it'll look more finished. It will change the way the drawstrings work, because I'll have one seam channel where the original item has two, but that's not a huge obstacle. 

Okay, enough yapping -- time for me to pull out Sally the Sewing Machine and get to work. 

EDIT: Oh heavens, last night I lay in bed thinking about leaving the gold out entirely and just doing the whole works in the stripe. Would that be too much? Or would it be jaw-dropping -- in a good way? Gonna have to think on this... cast your vote in the comments section!