Sunday, January 25, 2015
Hedgehog!
A short video about the habits of the hedgehog, based on a medieval bestiary in Latin, with English subtitles. You're welcome!
Monday, January 19, 2015
Upgrading my chaps!
I've been longing after a pair of proper chaps ever since I started riding; they're such a very cowgirl thing to have! Unfortunately they are quite expensive, and my usual recourse -- making my own-- is not much cheaper, once the leather is purchased. So of course I've been shopping for them secondhand.
My favorite online thrift store has them all the time, but apparently I'm not the only one looking for a pair. The shipping is usually about $15, which leads me to bid conservatively and I'm usually outbid very quickly. But finally I got this pair of black suede "shotgun" style fringed chaps for a bid of $5.95. With shipping, it was just over twenty bucks. No one else even bid! I wonder why? Oh well, they're mine now.
They were fine as they were: clean and workable, and the fit was good. But I decided it would be quite easy to re-design them a little, make them look more expensive, and personalize them using my leathercraft skills. Some friends of mine recently gifted me with a big piece of tooling leather, so I figured out a pattern based on the original parts, fancied it up a little, and started working.

The original yoke and belt. The wide belt goes at the back, and the thinner one buckles in front. Very adjustable, but not very fancy or interesting.
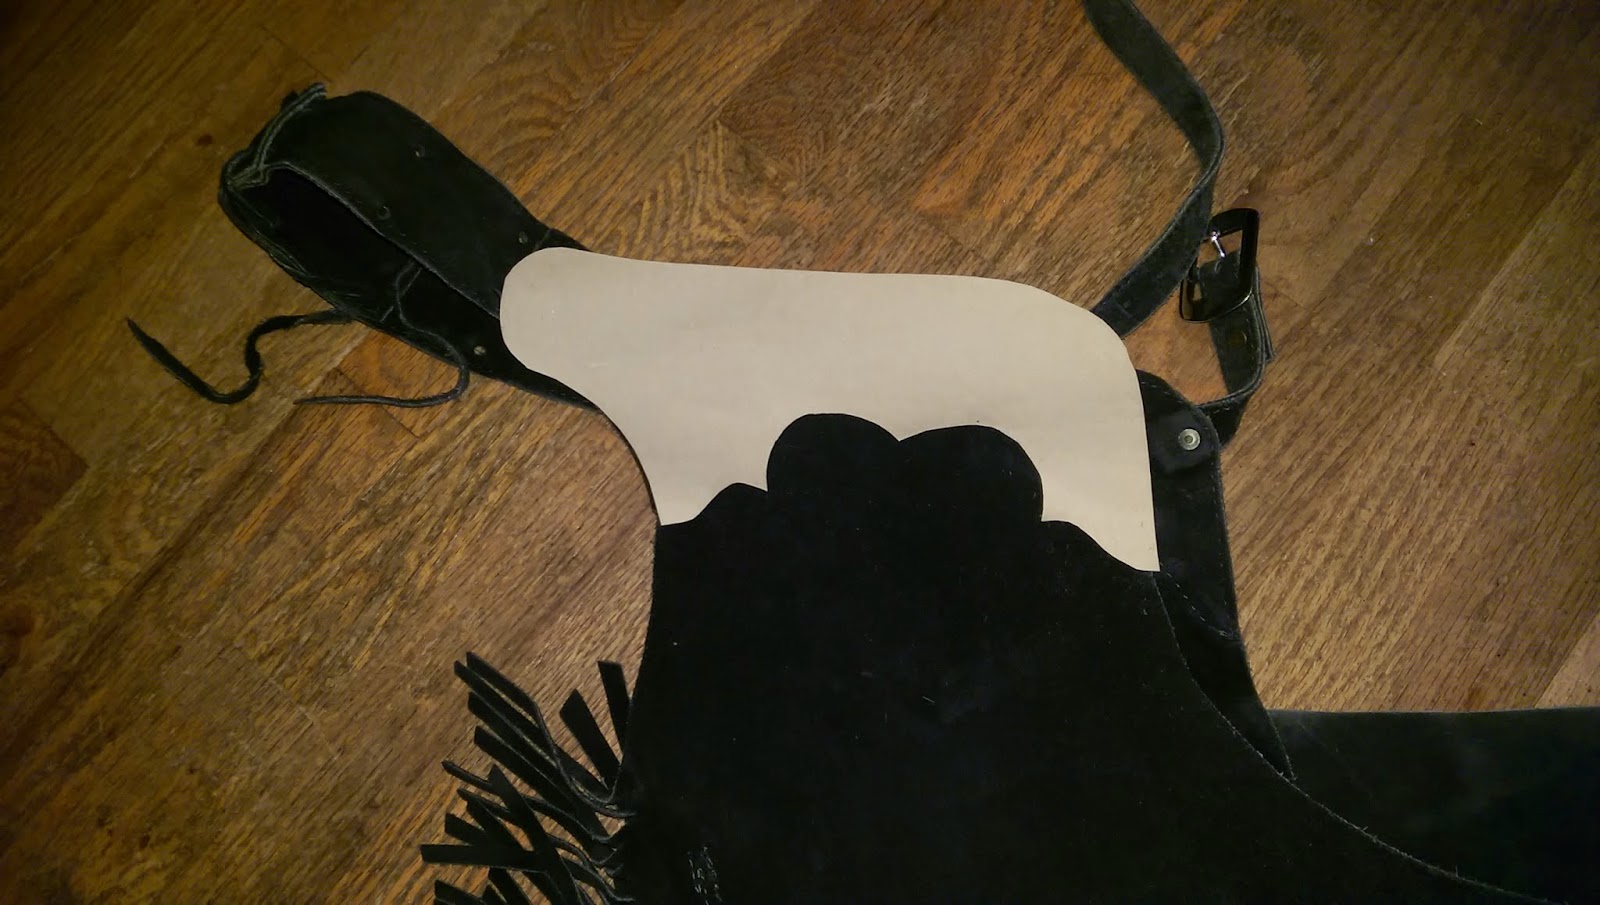
The pattern I made for the yokes, based on the original ones but with a few extra swirls and swoops to make it more eye-catching and, I think, feminine.

The yokes cut from tooling leather. In this pic I've only beveled the edges on the bottom one, and you can compare to see how this slight detail gives the piece a more finished appearance.

This was only the second time I'd ever used my basketweave stamp. It worked up pretty easily once I got the trick of it, and it looks nice!

Basketweave done and the design edge finished with a rainbow-esque cam tool. Looking pretty good. I'm starting to think this will turn out better than I hoped.

Both yoke pieces done. Then I cut a two inch strap for the back belt. I rounded the edges, beveled and stamped it, adding a monogram in the middle to personalize it.

The yoke pieces will be sewn on, and the back belt will attach to them with conchos. This will add for extra adjustment, if needed, as well as looking fancy. (I don't have the conchos yet.)

First coat of dye. It's still damp and a little uneven, but a second coat will fix that. Also, the lighting in the shop and my flash play havoc with the appearance of surfaces. I'm no professional photographer, alas! The color I chose is Lincoln Leather Dye's "Brown". Crazy name!

Glued in place with contact cement. You can see the tiny front belt I made. It's riveted in place, and the stitching on the edge of the leather will hold it even more firmly.

Concho hole punched, and the stitching begins. I have a piece of thick felt to keep the leather from getting scratched by the wooden stitching pony. I used black waxed heavy thread. Stitching leather by hand is slow work for me, but the look and quality is worth it.

Finished! Still need those conchos on the back, but then they go for their first ride on Wednesday. I've already got ideas of how I want to to do another pair, yikes!
My favorite online thrift store has them all the time, but apparently I'm not the only one looking for a pair. The shipping is usually about $15, which leads me to bid conservatively and I'm usually outbid very quickly. But finally I got this pair of black suede "shotgun" style fringed chaps for a bid of $5.95. With shipping, it was just over twenty bucks. No one else even bid! I wonder why? Oh well, they're mine now.
They were fine as they were: clean and workable, and the fit was good. But I decided it would be quite easy to re-design them a little, make them look more expensive, and personalize them using my leathercraft skills. Some friends of mine recently gifted me with a big piece of tooling leather, so I figured out a pattern based on the original parts, fancied it up a little, and started working.
The original yoke and belt. The wide belt goes at the back, and the thinner one buckles in front. Very adjustable, but not very fancy or interesting.
The pattern I made for the yokes, based on the original ones but with a few extra swirls and swoops to make it more eye-catching and, I think, feminine.
The yokes cut from tooling leather. In this pic I've only beveled the edges on the bottom one, and you can compare to see how this slight detail gives the piece a more finished appearance.
This was only the second time I'd ever used my basketweave stamp. It worked up pretty easily once I got the trick of it, and it looks nice!
Basketweave done and the design edge finished with a rainbow-esque cam tool. Looking pretty good. I'm starting to think this will turn out better than I hoped.
Both yoke pieces done. Then I cut a two inch strap for the back belt. I rounded the edges, beveled and stamped it, adding a monogram in the middle to personalize it.
The yoke pieces will be sewn on, and the back belt will attach to them with conchos. This will add for extra adjustment, if needed, as well as looking fancy. (I don't have the conchos yet.)
First coat of dye. It's still damp and a little uneven, but a second coat will fix that. Also, the lighting in the shop and my flash play havoc with the appearance of surfaces. I'm no professional photographer, alas! The color I chose is Lincoln Leather Dye's "Brown". Crazy name!
Glued in place with contact cement. You can see the tiny front belt I made. It's riveted in place, and the stitching on the edge of the leather will hold it even more firmly.
Concho hole punched, and the stitching begins. I have a piece of thick felt to keep the leather from getting scratched by the wooden stitching pony. I used black waxed heavy thread. Stitching leather by hand is slow work for me, but the look and quality is worth it.
Wednesday, January 14, 2015
insert foot pun here
Hobbit feet are hairy and thick-soled, and therefore hobbits don't wear shoes. Tolkien never said that Hobbit feet were big, except in the case of the Proudfoot family line, but artists have often drawn them with large feet and it's become a bit of an accepted fact.
I was okay with going barefoot to the party until the temperatures took a serious dip into the low 30s (zero Celsius!) , and then I decided I needed something to keep warm. A quick trip to the fabric shop and four dollars later, I had a sizeable piece of beige fleece from the remnant bin. Now, how was I going to make it into suitable feet?
It's the sort of thing that literally keeps me awake at night. I lie there in the dark and mentally fold and pin and stitch and amend until it's three am and I have a plan. I wanted something that looked right but wouldn't take forever to make, because time was short. I searched the internet and found something similar to what I had in mind, so with that idea and my own combined, I came up with this:
To make the pattern, place your bare foot onto paper and draw the shape of your Hobbit foot. I didn't go so much for big as I did long. Cut two layers for each foot and stitch them all the way around. Yep, all the way.

Now make sure that you have a right and a left foot! Then carefully cut an opening in the top only of each foot, starting about an inch and a half from the heel and about four inches long, and turn the feet inside-out so the seams are hidden inside. Go ahead and stick your feet in them to check the fit. Fleece is nice because there's a lot of stretch and give to it. I cut the openings in mine a little more oval-shaped to give a better fit. All good so far? Okay. Take the feet off and put a little stuffing in the toes and toe area.
Now you need a pair of socks. I got some mis-matched ones from the lonely sock bin in the laundry room. Put them on, and pull your Hobbit feet on over them. Add stuffing where needed to make a nice foot. I didn't put any underneath my foot or on the sides, just mostly around the toe and front of the foot to make it look right. Smooth out any lumps and when you're happy with how they look, pin (carefully!) the fleece to the ankle of your sock and gently remove your foot, leaving the sock as a lining in the Hobbit foot.
I'm sorry I didn't get pictures of the in-between steps. I get busy and I think I'll do it later, and then.. well.
I used a one-inch strip of fleece stitched around to cover the raw edges of the foot and sock. My husband felt like it was too loose and so I made his binding a little wider and added a strip of elastic in it to help the feet feel more secure. I found hand stitching to be easiest for this part.
A little fake fur stitched on the arch finished my feet. I think they look pretty good!

I didn't put on toenails because I thought they looked creepy. Your mileage may vary.
If I had more time, and this was for a proper cosplay event, I'd have taken more care with sculpting the toes and other details. I would have hand-tufted the foot hair to make it look a little more natural, and I'd have put a leather sole on the bottom for longer wear. But for a one-time party, I think they'll do nicely!
Oh, and here's a picture of us both in our full Hobbit regalia! What am I looking at? Who knows, haha -- it's not a great snap of me, but as usual, my hubby looks great.

I was okay with going barefoot to the party until the temperatures took a serious dip into the low 30s (zero Celsius!) , and then I decided I needed something to keep warm. A quick trip to the fabric shop and four dollars later, I had a sizeable piece of beige fleece from the remnant bin. Now, how was I going to make it into suitable feet?
It's the sort of thing that literally keeps me awake at night. I lie there in the dark and mentally fold and pin and stitch and amend until it's three am and I have a plan. I wanted something that looked right but wouldn't take forever to make, because time was short. I searched the internet and found something similar to what I had in mind, so with that idea and my own combined, I came up with this:
To make the pattern, place your bare foot onto paper and draw the shape of your Hobbit foot. I didn't go so much for big as I did long. Cut two layers for each foot and stitch them all the way around. Yep, all the way.
Now make sure that you have a right and a left foot! Then carefully cut an opening in the top only of each foot, starting about an inch and a half from the heel and about four inches long, and turn the feet inside-out so the seams are hidden inside. Go ahead and stick your feet in them to check the fit. Fleece is nice because there's a lot of stretch and give to it. I cut the openings in mine a little more oval-shaped to give a better fit. All good so far? Okay. Take the feet off and put a little stuffing in the toes and toe area.
Now you need a pair of socks. I got some mis-matched ones from the lonely sock bin in the laundry room. Put them on, and pull your Hobbit feet on over them. Add stuffing where needed to make a nice foot. I didn't put any underneath my foot or on the sides, just mostly around the toe and front of the foot to make it look right. Smooth out any lumps and when you're happy with how they look, pin (carefully!) the fleece to the ankle of your sock and gently remove your foot, leaving the sock as a lining in the Hobbit foot.
I'm sorry I didn't get pictures of the in-between steps. I get busy and I think I'll do it later, and then.. well.
I used a one-inch strip of fleece stitched around to cover the raw edges of the foot and sock. My husband felt like it was too loose and so I made his binding a little wider and added a strip of elastic in it to help the feet feel more secure. I found hand stitching to be easiest for this part.
A little fake fur stitched on the arch finished my feet. I think they look pretty good!
I didn't put on toenails because I thought they looked creepy. Your mileage may vary.
If I had more time, and this was for a proper cosplay event, I'd have taken more care with sculpting the toes and other details. I would have hand-tufted the foot hair to make it look a little more natural, and I'd have put a leather sole on the bottom for longer wear. But for a one-time party, I think they'll do nicely!
Oh, and here's a picture of us both in our full Hobbit regalia! What am I looking at? Who knows, haha -- it's not a great snap of me, but as usual, my hubby looks great.
Subscribe to:
Posts (Atom)