In between holiday gifts I'm working on and the huge pile of tack I'm cleaning for clients, I haven't got much to show you this week. I am keeping busy making things, though! Here's something I can share:
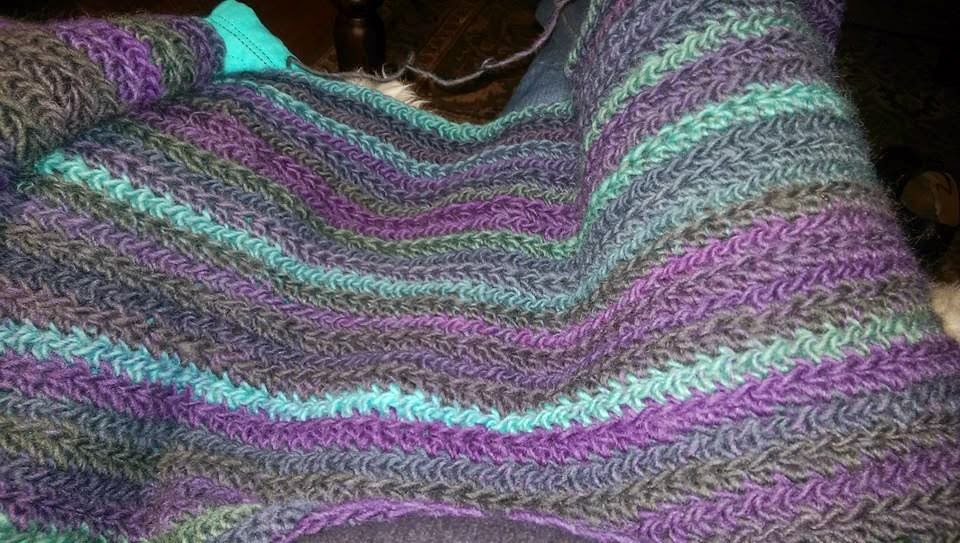
I've discovered a yarn goldmine that thrills my thrifty little heart-- the local shop sells one pound bags of "mill ends" for $8. Mill ends are factory leftovers, so there's not much choice if you're looking for something particular, but I tend to go in with an open mind and have found some really nice stuff! My happiest find was a worsted-weight fiber in shades of blue, teal, and purple. I got five skeins in my one pound bag, and when I got it home and did a burn test, I found I was right -- it was wool! (Possibly a blend with another natural fiber. There was no melting, and it self-extinguished quickly.) Soft and light, it was just what I had been looking for to make myself a little lap blanket.
I've been working the whole thing in half-double crochet, and I really like the swirly look -- it makes me think of ripples in water, or waves, or the aurora borealis.
The flash washed it out a little bit, but I wanted you all to be able to see the swirling stitches. Since this one is for me, I only work on it now and then between other (more important) gift projects. I was hoping it would be about four feet square when I got done, but I've just started my third skein and it's only about twenty inches wide. I'm definitely going to need another bag of that yarn. I hope I can find another one in the bins. If not, what will I do?? Probably fill in the middle with something that matches and then finish the end with another band of this wool, I guess. But I hope I don't have to!
Friday, November 14, 2014
Thursday, November 6, 2014
Monk's Hood
Well, that was easy. This simple pattern took two nights, and would have only taken one but I ran out of yarn had to go get another skein. My brain has this weird idea that one skein of any given yarn, provided it's of a standard size, should be plenty for any small project, especially if it's thick. Which is ridiculous, of course!
I didn't have a pattern per se for this project. I was still learning my stitches, so this is just a simple repetition of single crochet, skip a stitch, single crochet, skip, etc until it's what you want. I determined the length of my foundation chain by looping it around my neck until it felt about the right size. (As you can guess, I'm a very precise person.) The yarn is from the Deborah Norville line of Serenity Chunky Weight, a color called "After Dark". The picture of it on me is very close to the true color -- for once my camera didn't play up!
It's soft as anything, and warm without being heavy. I'm very pleased with it.
And now that it's November, you may notice my entries here becoming less frequent. This is not because I've stopped making things -- goodness, no-- but because the things I'm making are going to be gifts for the holidays, and I don't want to spoil any surprises! I've still got my Manuscript Challenge tunic to work on, along with any number of little things I'll want to share with you, so it's not like I'm going to disappear. I hope you also will have interesting, lively things to keep you busy during these cold times. Go have a cup of cocoa and I'll talk to you later!
I didn't have a pattern per se for this project. I was still learning my stitches, so this is just a simple repetition of single crochet, skip a stitch, single crochet, skip, etc until it's what you want. I determined the length of my foundation chain by looping it around my neck until it felt about the right size. (As you can guess, I'm a very precise person.) The yarn is from the Deborah Norville line of Serenity Chunky Weight, a color called "After Dark". The picture of it on me is very close to the true color -- for once my camera didn't play up!
It's soft as anything, and warm without being heavy. I'm very pleased with it.
And now that it's November, you may notice my entries here becoming less frequent. This is not because I've stopped making things -- goodness, no-- but because the things I'm making are going to be gifts for the holidays, and I don't want to spoil any surprises! I've still got my Manuscript Challenge tunic to work on, along with any number of little things I'll want to share with you, so it's not like I'm going to disappear. I hope you also will have interesting, lively things to keep you busy during these cold times. Go have a cup of cocoa and I'll talk to you later!
Friday, October 31, 2014
(Insert crochet pun here)
Fall has arrived with a vengeance and for the last two weeks every day has been pretty much the same: grey and gusty, with rain -- sometimes real deluges, drumming on the roof and turning the streets to rivers. It's cold and nasty and when I get home from work each night, all I want to do is curl up on the couch with a blanket and a cup of cocoa and watch The Simpson's Halloween marathon on tv.
The MC tunic still needs a neckhole and one sleeve and gore attached, but (blame it on the rain) I've been crocheting instead. There's just something so cozy about working with wool. I've discovered that while I'm not a particular fan of crochet with standard yarn and a size H hook (which every beginner book told me was the perfect place to start) but if I have a nice chunky yarn, like Lion's "Jiffy" and a giant hook, it's much easier for me to see what I'm doing and oh my goodness, I took off like crazy.
I used up a few scraps left over from nalbinding to hone my nascent skills, and then I hit the craft shop because I wanted to make a saddle pad for my horse. You know, one of those easy, small, starter projects. When I realized how many skeins of Jiffy I was going to need (at $6 a skein!) and started looking for something a little cheaper, especially as I wasn't sure how it would turn out! I found Collegiate yarn in a big bin, only $8 for a skein the size of my head! I bought two in bright red and scampered home in the rain to make my start.
And you guys, it turned out great! I worked it in the round in what I thought was a single crochet. Later I learned that my "single crochet" was actually a slip stitch. Whups! But it worked up nice and thick and the diamond pattern is attractive, so I'm pleased with it.
Later when I tried it with the saddle, I discovered that even though it was the same dimension as the saddle pad I normally use, there's something in the property of crochet that is different. I need to make it two inches wider, and two inches shorter. That means tearing it all apart and starting over. (I know you're thinking "Couldn't you just give it a turn on the horse's back and use it that way?", but the answer is no. Then it's an even worse fit.) Good thing I don't mind repetitive tasks. It only took me three evenings to finish as is, and it's not like the rain will be stopping any time soon.
I started looking online for simple patterns; easy projects I could finish in a day or so using new stitches and techniques. Dave picked out the next skein (Collegiate again, because you get so much for the price!), a purple, grey, and black variegated yarn and I said I'd make him a scarf. That's when I discovered that I am just awful at turning corners! All raggedy-looking and uneven, ugh.
So I decided I'd go back to working in the round again and make an infinity scarf -- just a big loop you wind around your neck. I didn't notice that I'd gotten a twist in my starting chain but it turned out in my favor because I didn't have to count rows, a huge plus! I was crocheting a mobius strip! I did about eight rows of single crochet, then one row of half-double crochet, one row of double crochet, and I was done. Looking at the picture, you can see the way the pattern reverses itself in the center of the scarf, but I think it looks great. Not very masculine (sorry, Dave!) but a nice learning piece and it'll make a good gift for someone.
So that's what I've been up to this week. Tonight is Halloween but I don't think we'll be getting many trick-or-treaters if this foul weather continues. I'll be finishing up a "Monk's Hood" cowl I'm making for myself from a soft, thick, forest green skein with a single crochet, skip stitch pattern. It's halfway done and going well so far, so stay tuned for pictures of that next time.
The MC tunic still needs a neckhole and one sleeve and gore attached, but (blame it on the rain) I've been crocheting instead. There's just something so cozy about working with wool. I've discovered that while I'm not a particular fan of crochet with standard yarn and a size H hook (which every beginner book told me was the perfect place to start) but if I have a nice chunky yarn, like Lion's "Jiffy" and a giant hook, it's much easier for me to see what I'm doing and oh my goodness, I took off like crazy.
I used up a few scraps left over from nalbinding to hone my nascent skills, and then I hit the craft shop because I wanted to make a saddle pad for my horse. You know, one of those easy, small, starter projects. When I realized how many skeins of Jiffy I was going to need (at $6 a skein!) and started looking for something a little cheaper, especially as I wasn't sure how it would turn out! I found Collegiate yarn in a big bin, only $8 for a skein the size of my head! I bought two in bright red and scampered home in the rain to make my start.
And you guys, it turned out great! I worked it in the round in what I thought was a single crochet. Later I learned that my "single crochet" was actually a slip stitch. Whups! But it worked up nice and thick and the diamond pattern is attractive, so I'm pleased with it.
Later when I tried it with the saddle, I discovered that even though it was the same dimension as the saddle pad I normally use, there's something in the property of crochet that is different. I need to make it two inches wider, and two inches shorter. That means tearing it all apart and starting over. (I know you're thinking "Couldn't you just give it a turn on the horse's back and use it that way?", but the answer is no. Then it's an even worse fit.) Good thing I don't mind repetitive tasks. It only took me three evenings to finish as is, and it's not like the rain will be stopping any time soon.
I started looking online for simple patterns; easy projects I could finish in a day or so using new stitches and techniques. Dave picked out the next skein (Collegiate again, because you get so much for the price!), a purple, grey, and black variegated yarn and I said I'd make him a scarf. That's when I discovered that I am just awful at turning corners! All raggedy-looking and uneven, ugh.
So I decided I'd go back to working in the round again and make an infinity scarf -- just a big loop you wind around your neck. I didn't notice that I'd gotten a twist in my starting chain but it turned out in my favor because I didn't have to count rows, a huge plus! I was crocheting a mobius strip! I did about eight rows of single crochet, then one row of half-double crochet, one row of double crochet, and I was done. Looking at the picture, you can see the way the pattern reverses itself in the center of the scarf, but I think it looks great. Not very masculine (sorry, Dave!) but a nice learning piece and it'll make a good gift for someone.
So that's what I've been up to this week. Tonight is Halloween but I don't think we'll be getting many trick-or-treaters if this foul weather continues. I'll be finishing up a "Monk's Hood" cowl I'm making for myself from a soft, thick, forest green skein with a single crochet, skip stitch pattern. It's halfway done and going well so far, so stay tuned for pictures of that next time.
Sunday, October 12, 2014
MC: The Tunic
Tonight is the season premier of The Walking Dead. Following tradition, we will be attending a watching party hosted by our friends. As I can't sit still and watch tv without some busywork in my hands, I decided to begin the tunic portion of my Manuscript Challenge.
It's a pretty straightforward pattern, with three main parts: body, sleeves, and gores. I based my style on this Dalmatic tunic (click the bottom text to see the pattern) although my sleeve insets are square, not rounded, and my neckline doesn't have that little tail on it.
When we dyed this fabric, my friend pointed out a few spots where the dye hadn't taken as well for whatever reason. (Yes, this is the same fabric! Amazing what different lighting can do to a camera.) I tried to work around those few spots, or place there where they'd be least noticeable, but there was just nothing for it when it came to this sleeve -- the spot was going to be right in the middle of it. I compared both sides of the fabric and decided that the one side was less noticeable than the other, so that will help, and I'll be sure to place it so the spot is on the back of the arm and not the front. Thank goodness I'll have that flashy cloak to command all the attention; no one will notice these few pale spots. I hope.
The store didn't have much to offer in the way of silk thread. This blue doesn't match exactly, but it's very close. Notice how the fabric color is again very different from the other pictures!
The color in real life is an almost perfect match to the inspiration picture, so let's end with that image again here. Next you'll see of this tunic is when it's put together and I start the gold work for the sleeves and hem.
It's a pretty straightforward pattern, with three main parts: body, sleeves, and gores. I based my style on this Dalmatic tunic (click the bottom text to see the pattern) although my sleeve insets are square, not rounded, and my neckline doesn't have that little tail on it.
When we dyed this fabric, my friend pointed out a few spots where the dye hadn't taken as well for whatever reason. (Yes, this is the same fabric! Amazing what different lighting can do to a camera.) I tried to work around those few spots, or place there where they'd be least noticeable, but there was just nothing for it when it came to this sleeve -- the spot was going to be right in the middle of it. I compared both sides of the fabric and decided that the one side was less noticeable than the other, so that will help, and I'll be sure to place it so the spot is on the back of the arm and not the front. Thank goodness I'll have that flashy cloak to command all the attention; no one will notice these few pale spots. I hope.
The store didn't have much to offer in the way of silk thread. This blue doesn't match exactly, but it's very close. Notice how the fabric color is again very different from the other pictures!
The color in real life is an almost perfect match to the inspiration picture, so let's end with that image again here. Next you'll see of this tunic is when it's put together and I start the gold work for the sleeves and hem.
Monday, September 22, 2014
Quickie Project: Jodhpurs!
With Steamposium fast approaching and the local thrift chain stores full of costumes, inspiration is everywhere and I'm all too easy to sidetrack into little demi-projects. Yesterday I found a pair of vintage 1951 military field pants for six dollars that I thought could easily be made into a pair of jodhpurs.
Jodhpurs are those puffy-legged pants you see on British adventurers of a certain era, or old-school equestrians, or 1930s movie directors with megaphones. Like this:
Like a lot of vintage pants, they are high-waisted, sitting at the natural waist instead of the hips. That's what made the field pants I found so great -- they had a generous rise and fit at the waist. They were also full through the seat and thighs, which I hoped would be enough to give that poofy look without me having to set in gores or anything. I didn't get any "before" pictures because I was too excited and started cutting, but here's a link to a pair exactly the same, and a picture in case the link dies.
I put them on and marked with chalk where my knee was and pinned along my calf to how tight I wanted the lower legs to fit.
I left the inseam alone and only removed fabric from the outside edge, to keep a more finished look. I basted the path I intended to cut and sew to make sure of the fit before proceeding and then, with crossed fingers for luck, I cut out and stitched the new outer leg seam. I left five inches of the cuffs entirely alone so I could figure out a buttoned flap to fasten the cuffs snugly.
They're not perfect-- I think I may take them a little higher up the knee -- but the fit is good, and when I put my hands in the pockets, they "poof" correctly. They could be a little fuller, but I'm not going to mess with that. They're fine for costume wear, and that's what I intend them for, so it's a good effort.
The nice thing about jods is their versatility. You can dress them up with a shirt and jacket, or down with a undershirt. Just like jeans, I guess. I tried a few things from my wardrobe to see how they looked.
I've also learned that snapping selfies with the timer gives me enough time to strike a pose, but not enough to work up a smile. Don't I look serious? Any suggestions on what to wear with my jods? Put them in the comments. Thanks!
Jodhpurs are those puffy-legged pants you see on British adventurers of a certain era, or old-school equestrians, or 1930s movie directors with megaphones. Like this:
Like a lot of vintage pants, they are high-waisted, sitting at the natural waist instead of the hips. That's what made the field pants I found so great -- they had a generous rise and fit at the waist. They were also full through the seat and thighs, which I hoped would be enough to give that poofy look without me having to set in gores or anything. I didn't get any "before" pictures because I was too excited and started cutting, but here's a link to a pair exactly the same, and a picture in case the link dies.
I put them on and marked with chalk where my knee was and pinned along my calf to how tight I wanted the lower legs to fit.
I left the inseam alone and only removed fabric from the outside edge, to keep a more finished look. I basted the path I intended to cut and sew to make sure of the fit before proceeding and then, with crossed fingers for luck, I cut out and stitched the new outer leg seam. I left five inches of the cuffs entirely alone so I could figure out a buttoned flap to fasten the cuffs snugly.
They're not perfect-- I think I may take them a little higher up the knee -- but the fit is good, and when I put my hands in the pockets, they "poof" correctly. They could be a little fuller, but I'm not going to mess with that. They're fine for costume wear, and that's what I intend them for, so it's a good effort.
The nice thing about jods is their versatility. You can dress them up with a shirt and jacket, or down with a undershirt. Just like jeans, I guess. I tried a few things from my wardrobe to see how they looked.
I've also learned that snapping selfies with the timer gives me enough time to strike a pose, but not enough to work up a smile. Don't I look serious? Any suggestions on what to wear with my jods? Put them in the comments. Thanks!
Saturday, September 20, 2014
The Boy Makes It, too!
I have a son ("The Boy") and he makes music. Thought I'd post his new EP here for my friends to listen to. What a talented family I have!
Seattle Steamposium 2014
This year's steampunk convention, the Steamposium, is next Saturday --a week away!-- and so I've brought out my outfit and checked to see if it needs any mends or freshening after hanging in the closet for a year.
Except for taking the waist by an inch (yay!) everything looks good. Then I remembered how last year I couldn't take off my jacket because *confession* I had finished the skirt's waistband with pale green bias tape. (I was in a hurry, okay? I always meant to do it properly, but there's a lesson for you: do it right the first time!) The leather belt I threw around my waist to keep my skirt my from sliding down and to try to cover up the green didn't do a proper job and so I had to keep my jacket on and buttoned up so no one could see my shameful shortcut.
The ubiquitous steampunk corset is a trope I was trying avoid, sticking to my mantra of "No corset, no goggles, no pointless gears." I mean, let's show a little creativity, folks. Besides that, corsets never give me a proper curvy waistline; I'm built like a tree trunk. They just make me look like a fancier tree trunk. I decided a wide belt would suit my needs and after considering leather I decided to see what I could do with scraps from my stash. It took me three hours on the sewing machine, cutting a modified version of my original corset pattern from a brocaded satin with a canvas backing for strength, nylon stays, and crimson velveteen binding. Six grommets fit out the back and a piece of black ribbon ties it all together, though I may change that for a bootlace or similar for easier tightening.
Here it is on Imogene. She's not got a squishy waist like mine, so I don't have it snug, but you can see the effect of it. I've got the jacket flipped back so you can see most of it.
Mostly I'm going to have my jacket buttoned and no one will see the belt at all, but if I get hot it will be nice to be able to shrug it off, roll up my shirtsleeves, and not worry about anyone catching a peep of that green bias tape.
I'm thinking there will be a little more decoration on that belt, too -- maybe some buttons with chain swagged between them. We'll see.
I've got almost all the sequins done on the MC cloak, too. Next month I'll start work on the tunic, so stay tuned for that!
Except for taking the waist by an inch (yay!) everything looks good. Then I remembered how last year I couldn't take off my jacket because *confession* I had finished the skirt's waistband with pale green bias tape. (I was in a hurry, okay? I always meant to do it properly, but there's a lesson for you: do it right the first time!) The leather belt I threw around my waist to keep my skirt my from sliding down and to try to cover up the green didn't do a proper job and so I had to keep my jacket on and buttoned up so no one could see my shameful shortcut.
The ubiquitous steampunk corset is a trope I was trying avoid, sticking to my mantra of "No corset, no goggles, no pointless gears." I mean, let's show a little creativity, folks. Besides that, corsets never give me a proper curvy waistline; I'm built like a tree trunk. They just make me look like a fancier tree trunk. I decided a wide belt would suit my needs and after considering leather I decided to see what I could do with scraps from my stash. It took me three hours on the sewing machine, cutting a modified version of my original corset pattern from a brocaded satin with a canvas backing for strength, nylon stays, and crimson velveteen binding. Six grommets fit out the back and a piece of black ribbon ties it all together, though I may change that for a bootlace or similar for easier tightening.
Here it is on Imogene. She's not got a squishy waist like mine, so I don't have it snug, but you can see the effect of it. I've got the jacket flipped back so you can see most of it.
Mostly I'm going to have my jacket buttoned and no one will see the belt at all, but if I get hot it will be nice to be able to shrug it off, roll up my shirtsleeves, and not worry about anyone catching a peep of that green bias tape.
I'm thinking there will be a little more decoration on that belt, too -- maybe some buttons with chain swagged between them. We'll see.
I've got almost all the sequins done on the MC cloak, too. Next month I'll start work on the tunic, so stay tuned for that!
Subscribe to:
Posts (Atom)


