Monday, January 28, 2013

Stripping.

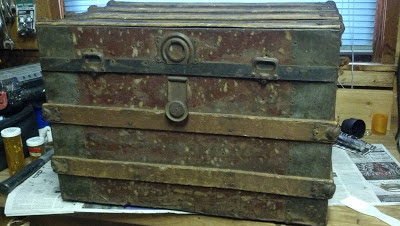
Steaming the paper off the inside of the trunk has revealed some little surprises. 

First, there is a gap between two of the slats in the bottom and instead of fixing it snug, the maker just slapped a piece of cloth tape over it and then covered it with paper. I suppose they figured the metal covering would keep out the damp and whatnot, so I can't fault them, but I do think it's kinda funny.

Also, contrary to what I expected, most of the wood slats are very rough, not sanded smooth. Again, since the inside was covered in paper and the outside was covered in metal, why waste time sanding? 

I'm very glad that my trunk doesn't smell of mothballs or anything else, really. When I steam away, all I smell is damp wood and old paper, and I don't mind that at all. 


The wood is in pretty good shape, for being a century old. 

Here's where the handle attached, where the worst of the rusted metal has to be taken off. You can easily see the original color of the paint, and the white and gold speckling that made up the "mottled" finish. I really wish there were a way for me to easily recreate that effect at home, but I'm not one for slinging around solvents and applying heat with torches. Things go boom!


I pulled the rusted-through metal off the right side. I thought it would be in one piece, but it wasn't; it was in strips about five inches wide, so I only had to remove one of the wooden slats to take off the bad pieces. The wood underneath seems fine. One or two of the nail holes are a bit worn, so I'll touch them up with wood filler before putting the new metal on.


The slat clamps (that's what those metal bumpy things on the corners are called) were pretty corroded by rust on this slat. I'll have to replace one for sure, maybe both, but i'm trying to retain as much of the old hardware as I can.  (Oh, and those pieces of tape are marking where tackheads came off, leaving sharp little spikes in the wood that I'll have to dig out.) 

I'm using a piece of aluminum to replace the stuff I took off. I've read sources that say the material on this trunk is tin, and others that say it's steel. I'm no metallurgist, but I do know that the steel and aluminum sheets I found at Home Depot were too thick, and they didn't have tin at all. One of our neighbors had a piece of aluminum vent that is just the right weight to match, and once it's painted I think it'll look fine. And if anyone wants to make a fuss about that, well, they can do the trunk rehab next time. 

Sunday, January 27, 2013

More Trunk Junk.

I spent the last few days sniffing around the interwebz for any information I could find on my newest acquisition. This is what I learned, based on multiple sources:

My trunk dates from 1880-1910. This was determined from the Corbin Cabinet Lock Company fastener on the front, and the way its lettering was arranged. More than a hundred years old -- that's pretty cool.

Trunks were made of an inner box (usually pine or cedar) that was then covered with something to protect it -- heavy paper, canvas, leather, tin or -rarely- oak slats. When "restoring" old trunks nowadays, the outer cover is usually stripped away due to bad condition and the wood underneath is then sanded, stained or painted, and polished. While this may look nice, and it's fine for indoor use as a blanket chest or coffee table, it's not the way a trunk is meant to be. All the protection is gone from the inner box, and the soft wood is exposed! One trunk expert said it was rather like stripping all the paint from your car.

My trunk is covered in sheet metal with a somewhat unusual "mottled" finish. Layers of paint were applied to the metal, and the finish was spattered with a solvent to create the speckled appearance. It was then coated with lacquer. I contacted Jim at HMS Antique Trunks to ask how rare this method was. The finish on my trunk is pretty worn, but I didn't want to cover it if it was a valuable feature. He told me that as the paint is very worn, it would make no real difference if I wanted to repaint the trunk.


On the wooden slats on the top and right side is written the name of a former owner: "Mrs H. Quentin, Cashmere, WA", and on the trunk's left is "Glass. Handle with Care". I searched the White Pages for Cashmere and didn't find any Quentins there. Oh well.


The inside of the trunk is papered with a blue and white ticking stripe. There's a rest for a top tray, but it's missing. Someone banged in a newer strip of pine along the back for some reason and didn't do a very good job of it -- the nails are far too long and just bent over. I started stripping out the paper the other night and the inner box is in very good shape, so I'm not sure why they felt this extra support was needed, unless it's because the lid stay is broken.

The box's top edge has taken some knocks and dings, and there are places where the metal is torn and jagged. There were a few puzzle pieces and toy bits in the trunk when I opened it -- plastic things, modern things -- and it makes me wonder what kind of parent thinks a jagged-metal edged trunk makes a good toybox for a small child.

No matter. It's going to be fixed and make a lovely tack chest for my bridles and horse-y whatnots.   Now I have to get to work. Stay tuned to see my progress on this project!

Thursday, January 24, 2013

Lucky!

Today is the day of fantastic five-dollar thrift store finds! Stay tuned to see if I can manage to do anything to restore this trunk. It's already much improved since I stripped off the "woodgrain" contact paper that was slapped over it.


Parts are missing, and the metal is rusted away in one spot, but I think with some cleaning, sanding, and patching, it will be a really cute little trunk to keep stuff in. It's just loaded with history, too, but I'll tell you more about that next time.

Wednesday, January 23, 2013

Lucky?

I am so lucky to have a bust of my husband at home to wet-form his leather mask to. It will fit him perfectly when it dries! I will admit I felt a little odd wrapping his face in cling film, though...

Friday, January 11, 2013

Busy week!

I've got more clients this weekend than you've had hot soup.  But I don't want to leave you gasping and clutching at my hems, wailing about having nothing new to see here, so I'm going to point you to this fine lady:

http://www.fanbloomingtastic.com/

Tempest (a/k/a Sarah)  is fast becoming a heroine to me. She's smart, funny, gorgeous -- and just look at her sewing!

Sometimes I get in a funk about my nonexistent waistline, especially after viewing blog after blog of shapely young girls who look perfect in everything. It's inspiring to see someone near my age, built like me, looking absolutely smashing in outfit after outfit that she's made herself.

Okay, I gotta get back to work. Go play!

Friday, January 4, 2013

Post Apoca-whatnow?

I'm sitting at my desk now, but just moments ago, I was doing a little happy-clappy dance of joy in the hallway because this project is turning out so very well. Let's not wait any longer -- I have to show you what I made!

The pattern I came up with was pretty simple, just three pieces form the sides of the beak and the lower jaw.     Right from the start, the shape of the beak pleased me immensely -- it just flowed.


Pushing a needle through 1/4 inch saddle leather would be a Herculean task, so I pre-drilled my stitching holes using my handy dandy Dremel tool. In order to keep the spacing even, I used a tiny fork to mark the leather. It worked a treat!


It pays to take time to really think through the steps of your project. I was all ready to start stitching the top of the beak when I realized that doing so would make sewing the lower jaw practically impossible. Heavy duty waxed thread and a long needle plus a pair of pliers helped the work along. 
There are tons of how-to videos on the web about how to stitch leather. I looked at a handful, but this one was nice and clear


Once the stitching was done, I took the mask to the sink and ran water all over it inside and out. Wet leather is very pliable and wants to be your friend. I checked the shape on my face, and then stuffed a small towel inside the beak to get that nice round shape.  I turned the lights out and headed to bed because I was worn out, but I couldn't get to sleep for a bit because I kept thinking of how I was going to finish it.


Morning! This is where I learned something: eye holes are difficult to cut out once the mask is stitched together. It would have been much easier to cut them out beforehand. The reason I didn't is that I wanted to make sure of the placement. Wouldn't it have been sad to do all that stitching and stretching only to find that the eye holes were halfway up my forehead?


For the filters, I'm using two garden watering bubblers I painted black. They cost about $8 each and were the most expensive part of this project. I picked them because not only did they look the part, but they attach to a garden hose with just a few twists.  I figured I'd use a male hose adapter on the inside of the mask, poke it through, and then screw the bubbler on the outside.  There are a couple of different styles, and I liked these best. They're lightweight and air moves freely through them, so they provide a lot of ventilation in the heavy leather mask.

For the eyepieces, I picked up a pvc compression coupler, took off the ring (eyepiece!) ends and cut the middle pipe down  to two ends with 3/4 of an inch of threading. I made the eyeholes a little small and then wetted the leather so it would stretch a bit.I worked the threaded bit through, then covered the end with a bit of black nylon screen, and screwed the endcaps back on, creating the "goggle". I'm not completely happy with the screen --I'd like something a bit more opaque -- but it'll do for now.

Once the eyepieces were fitted, and the filters were ready to be attached, I sorted through the box of old bridle parts I keep handy for repairs and found a piece to use as the mask strap. I used a screw-rivet on one end, and cut a slot for the leather to pass through on the other side. There were already buckles on the piece I chose, so I didn't have to mess with attaching those. It was pretty easy.

Then I gave the whole thing a go-over with the dark brown dye I had left from dying my bridle last week.

Then I ate a plate of spaghetti and meatballs, because I was hungry!

Then my mask was dry and I capered to the mirror to see how it looked...


Pretty amazing! And will be even more so, once I darken those lenses so I look even more mysterious and spooooooky.  The braid hanging down isn't part of the mask -- that's just my hair photo-bombing, like it does.


Here's a shot of the inside. I had to epoxy in a soft leather pad over the eyepieces because the plastic rested on my brow bone and it was uncomfortable, so I have a secret unibrow, which makes me laugh. Or maybe that's from trying on the mask before the epoxy was completely dry and the fumes made me all giddy...

Thursday, January 3, 2013

Serious Leatherwork

My boy got me two huge pieces of saddle leather for Christmas, just the sort of stuff I like to have around for repairs and minor projects like the short-fork martingale I featured recently. His gift coincided with an invitation to a "Post-Apocalypse" party this weekend, giving me just enough time to make something cool to wear; something I've admired on others and always wanted to have myself. Wanna see?

I was inspired by the bird-like masks worn by doctors during the Plague. Apparently the cone-shaped beak held herbs and other stuff believed to keep the wearer from getting ill. You know the ones I mean? Here's a picture for reference.


Kinda creepy. Can you imagine being all sick with the plague, and looking up from sweaty delirium and seeing this fella by your bedside? Yikes!

Steampunk society (if I can judge by Google searches) seems to rank a plague doctor mask right up there with corsets and goggles as Nifty Stuff To Have. And while I'm hardly one to bow to trends as a general rule, sometimes I will admit that trends have a good point. Point established: I want one!  But not one like everyone else might have. I decided that after an apocalypse, besides disease being rampant, there would also be fumes and gases and smoke. *cough cough cough!* A person would want to filter that stuff out along with germs, so I planned to incorporate a gas mask/filter/re-breather into my bird mask.

First step: come up with a design and make a pattern.


Here's what I came up with sketch-wise and making a pattern out of brown paper. Pretty simple. I made the beak a bit shorter and rounded the top to give more of a falcon effect. The circles on the lower piece are where the filters will attach.

When I get back from work and my riding lesson, I'll show you pictures of the build so far. It's turning out pretty well, considering my lack of leather working experience!