Wednesday, March 18, 2015

Early birthday!

I found this little guy on eBay and just fell in love. I'm not sure what it says about me that I love him even though-- and perhaps because -- he's missing his left arm. Sometimes you look across a crowded room and your eyes meet and you just know it's meant to be, you know? But he was twenty dollars, far more than I'll spend on myself for a silly old bear even if he is awesome. Instead I linked him on Facebook for my friends to see and made a fuss of him there, mentioning that if anyone was looking for a birthday present for me, this differently-abled bear would be joyfully received. 


Imagine my surprise when I went into the bedroom one night two weeks later to put on my slippers and there he was, sitting on the shelf with the rest of the hug ("Hug" is the collective noun for a group of teddy bears, really! You can look it up!), looking like he'd been there for ages and making himself at home. Dave says he was wondering when I was going to notice; apparently the bear had been there all day and I hadn't seen it in all the times I'd been in the room. But this time I did see him and...

"Albert von Marzipan!" I squealed.

Wait, what..? 

Oh, didn't I tell you? His name is Albert von Marzipan. I named him while he was still on eBay, because I'm strange like that. 

Dave says he was going to give him to me for my birthday in April, but he just couldn't keep him in a box wrapped in plastic bubble wrap that long. Which is a very unusual thing for Dave to say, beings as he does not tend to anthropomorphize bears --or anything really. What an entirely sweet gesture! 

AvM (for short) is a Hermann bear, made in Germany in the 1930s. His sparse coat is meant to look that way; he's not moth-eaten. He has glass eyes and a "growler" that doesn't work, but if it did, would make a sound when tipped forward and back (think of those cow moo toys), and he is very firmly stuffed with "woodwool" -- long shavings of wood that feel like stiff straw.  

His paw pads are in very bad shape, so the first thing I did was cut him some new ones from a matching wool I had in my stash, and stitch them on with silk thread, turning under the edges for a nice finish. Repairs like this, carefully done with appropriate materials, do not detract from the bear's value. I'll admit I was a little nervous, but I think the end result was good.


The seller's picture was very yellowish. This snap shows AvM's true color, and also the soft green wrap I crocheted him to keep off the chill. Elderly bears appreciate a little extra warmth. The neckerchief he came with is linen embroidered with a yellow and orange pansy-type flower, probably a token from an old sweetheart. 

Dave says, "Now you can make him a steampunk prosthetic arm!" And I thought "Ha ha, yeah!" But then I looked at the cheerful demeanor of this little guy and... it's just not his style, you know? While the soft part of his arm is gone, the wood disk and cotter pin are still attached. It would not be difficult to sew a replacement arm for him but doing so in a way that retained his value would mean finding a piece of matching-color sparse mohair, And I'd have to stuff it with woodwool, which takes a certain talent to pack in without gaps or lumps. 

Honestly, I think he looks great without the arm. It adds to his character. I like him just the way he is. 

The whole "hug".
Oh! And I made a second bear from the same pattern as Roy Tulip, using some black faux fur from an old coat. I'm not sure the sweater suits him at all, so when I get some time, I'll make him a red plaid shirt and maybe some overalls.  He looks like an outdoors-y sort. 


That's all for now. It feels like ages since I sewed any garments, doesn't it? And time is ticking by on my Manuscript Project -- which I have been completely ignoring. But this is the thing about hobbies-- you get to do what you want, when you want. Except when it's time to go to work. Which is now. See you next time! 


Saturday, March 7, 2015

Roy Tulip!

All the pieces were stitched together, but I had to wait for the joints I ordered to arrive in the mail. The local craft shop had a four-foot section of plastic googly eyes, and next to that another section of safety eyes, plastic noses, wig hair, wings and halos, wire-rimmed doll spectacles, display stands and all sorts of other things, but not a single packet of joint assemblies. Thank goodness for Amazon. 

The blue yarn marks eye placement, and there are scribbled markings to show where everything attaches, but the bear really doesn't look like much in its inside-out, marked-up state. I had a moment of concern that it wasn't going to turn out particularly well. 


But once the stuffing was in and the joints were snapped together, I had a VERY cute bear! A few stitches with tapestry wool added the finishing touches to his paws and claws and gave him a nose and mouth.


I clipped the fur shorter on his muzzle, which gives a nice antique look. Don't tell Dave I used his beard trimmer for that.


A little blue sweater added the perfect cozy touch. I call him Roy Tulip, because that's his name.


I've started work on a second bear (mostly because the packet of joints had enough for another one) that will have black fur and a brown muzzle and paws. I don't know if it'll turn out as well, because I really like the variations in Roy Tulip's fur and the solid black won't have that same look, but we'll see. Stay tuned!

Tuesday, March 3, 2015

Time for Bear Puns.

I'm a latecomer to the teddy bear fan club. I remember a few in the general accumulation of stuffed animal toys in my childhood, but none stood out as a particular friend. I always thought of teddy bears as rather sentimental, cliche objects and as a rough and tumble tomboy, a fuzzy widdle bear was not of interest.

I was at the thrift shop one day, stuck in a narrow aisle behind a rather large woman pushing a cart. As she went along, she knocked a stuffed bear from the shelf and it fell to the floor by her feet. She kicked it aside and continued on her way. It's common manners to pick up something that falls. Kicking it aside? That's just rude. Irritated, I bent to retrieve the bear. And when I picked it up, I thought, Wow, this is a nice bear! 

He was soft, with weighted paws. His eyes shone and an affable smile was almost hidden by his sort of cotton-y golden fur. His expression was not the wide-eyed cheerful idiocy of most modern commercial bears. He had a personality, and I found it irresistable. I noticed the green sweater he was wearing had a few holes and snags. Looks like you've hit hard times, friend. I said. We'll have to get you a new sweater.

And $1.29 later, he was mine. I named him Ivan in the car on the way home.

This is Ivan! You might remember him such previous posts
where he sported an exploring outfit and was a victim in a carjacking. .

Since then, I have added three more of the same style bears to my collection: Henry, Seamus, and Walt. But I wasn't a collector, or a weirdo. I just find this particular bear comforting and friendly! He's a good size and nice and squishy, and I just like him, okay?

Then I picked up a book called Teddy's World , full of photos of European-style bears exploring the history and habits of teddies, and rather began to like the look of these antique mohair bears. And before long, I decided I'd like to have one of those for myself.

And as they are quite expensive and my bear budget seems to be $1.29, I bet you can guess what this is leading to, based on the name of this blog. Yep.

I found a pattern for a 1907 Bear online, printed it out at a workable size, and found an old faux fur wrap in my stash that I felt would look good as a bear. I deconstructed the wrap and began tracing my pattern onto it.


I've decided to keep the satin lining and make a vest or something for the bear to wear. Maybe a dress, but I'm not partial to lady bears. We'll see.

After cutting all my pieces out carefully, I sat down to start sewing it together and that's when I discovered that the pattern did not include a seam allowance which made me say some very crabby things. But handsewing is a marvelous thing and so I'm whipstitching it together and I think it's going to be just fine. Fortunately my faux fur has a sturdy cloth backing.


Body and left leg done. Look at that chubby little leg! I think this is going to turn out very cute. Dave is wondering if he's going to have to stage some sort of intervention for the bear craziness. I told him I felt like Richard Dreyfuss in that Close Encounters movie, and bears are my Devil's Tower. We just need to ride this through until I get it out of my system.  Stay tuned for further pictures of bear assembly and cuteness!

Sunday, February 8, 2015

Tack Repair Takes Off

You've all seen my saddle restoration projects and the horse-y this-n-thats that I've made now and then. But now, after a year or so of mentioning it consistently to friends, I'm finally starting to get a small reputation with my skills. My friend Paige has been really good about handing me awful stuff, usually with a line like "I'm just going to throw this away if you can't fix it, so..." Case in point, this braided rawhide noseband: 


The braiding on the noseband itself is so fine that I thought at first it was a piece of cotton rope. The individual strips it's braided from are less than a millimeter wide. It's a piece of art showing extreme skill in construction. Unfortunately, a bad horse got ahold of it and chewed it up. The leather headstall was dirty, dry, and mangled. I cut and tied a new one from latigo leather, and wrapped some thin sinew around the noseband where it was ragged. The color matched, and as the leather strap went over that spot, the mend was not very noticeable. A little saddle soap and conditioner later, and we have piece that's ready to get back to work.


"Okay," says Paige, "You think you're so smart; Here's a leather handbag I've had since the 80's. A puppy chewed up the handle. I've taken it to other places and they say it can't be fixed. Let's see what you can do."

I bought a spool of matching plastic lace for three bucks (Yes, the original used plastic lace, not leather.) and pulled out a booklet I'd photocopied ages ago about leather lacing techniques. The drawings turned out to be difficult for me to figure out, but I found a video on Tandy Leather's site that made it clearer. I used my sinew again, to stitch where the puppy had chewed through, and my stitches were hidden when I worked the lacing over them.


You can see where I started the new stitching, can't you. Me, too. It kinda bugs me now, but it's not bad for the first time ever using a technique. Paige was pleased, and maybe someday I'll get a minute and can work that stitch so it's a little more elegant.


Back to work, handbag! And keep away from those naughty puppies!

So, now I had a new skill to practice, and a spool of plastic lacing to use up. I decided to try my hand at another noseband. Using new leather and hardware from my stash, I worked up this in two nights. (Lacing takes more time than you'd think!) The pattern stamped on the leather is from a stamp I made myself from a nail. You might remember seeing it in my posts about the charro saddle.


Here's a closeup of the noseband, with fancy stamping and that pretty lacework.


Here's the finished noseband, with handstitched keepers and buckles, and a little touch of silver at the sides to make it interesting.


 My beautiful and slightly blurry Imp models for us. (Ignore the tatty green halter around his neck. He really could use a new one, but it has his name on it, and I'm a little sentimental.)

After taking the pictures, I posted the noseband for sale and sold it in five minutes for $25. Not bad for something that I made with stuff I had laying around. The girl that bought it has a palomino. It'll look terrific on him!

Paige had been talking me up to her friends, so I got a call from a woman who wanted me to clean a saddle she wanted to sell. It wasn't a terrific challenge, but it was oil-tanned leather, which I hadn't worked with much before. When I first hit it with the saddle soap, the leather changed color alarmingly, turning from red to a greyish-brown. I was certain I had ruined it -- and as the saddle is worth thousands, you can understand why I panicked a little. But a little rub with neatsfoot oil put it right. *whew!*


Dusty and sad... 


Shiny and happy! 

And then Paige came through again, with another friend who had a bag similar to hers that needed the lacing re-done. This time the lacing was real leather, not plastic, and she had included several yards of the stuff so I didn't need to buy any.  I re-did the entire lacing at the bottom, and the top half of each handle, then cleaned and conditioned the entire bag so it will be good to go for another 33 years. 


Leather is a very satisfying medium to work with. I am constantly pleased with how well it responds to treatment.

That said, I bet you're wondering how my Manuscript Challenge is going. I need to get going on that. I still have the neckline and embroidery on the tunic, and then I start with the armor!  I've got plenty of things coming up to show you.

Sunday, January 25, 2015

Hedgehog!

A short video about the habits of the hedgehog, based on a medieval bestiary in Latin, with English subtitles. You're welcome!


Monday, January 19, 2015

Upgrading my chaps!

I've been longing after a pair of proper chaps ever since I started riding; they're such a very cowgirl thing to have! Unfortunately they are quite expensive, and my usual recourse -- making my own-- is not much cheaper, once the leather is purchased. So of course I've been shopping for them secondhand.

My favorite online thrift store has them all the time, but apparently I'm not the only one looking for a pair. The shipping is usually about $15, which leads me to bid conservatively and I'm usually outbid very quickly. But finally I got this pair of black suede "shotgun" style fringed chaps for a bid of $5.95. With shipping, it was just over twenty bucks. No one else even bid! I wonder why? Oh well, they're mine now.

They were fine as they were: clean and workable, and the fit was good. But I decided it would be quite easy to re-design them a little, make them look more expensive, and personalize them using my leathercraft skills. Some friends of mine recently gifted me with a big piece of tooling leather, so I figured out a pattern based on the original parts, fancied it up a little, and started working.


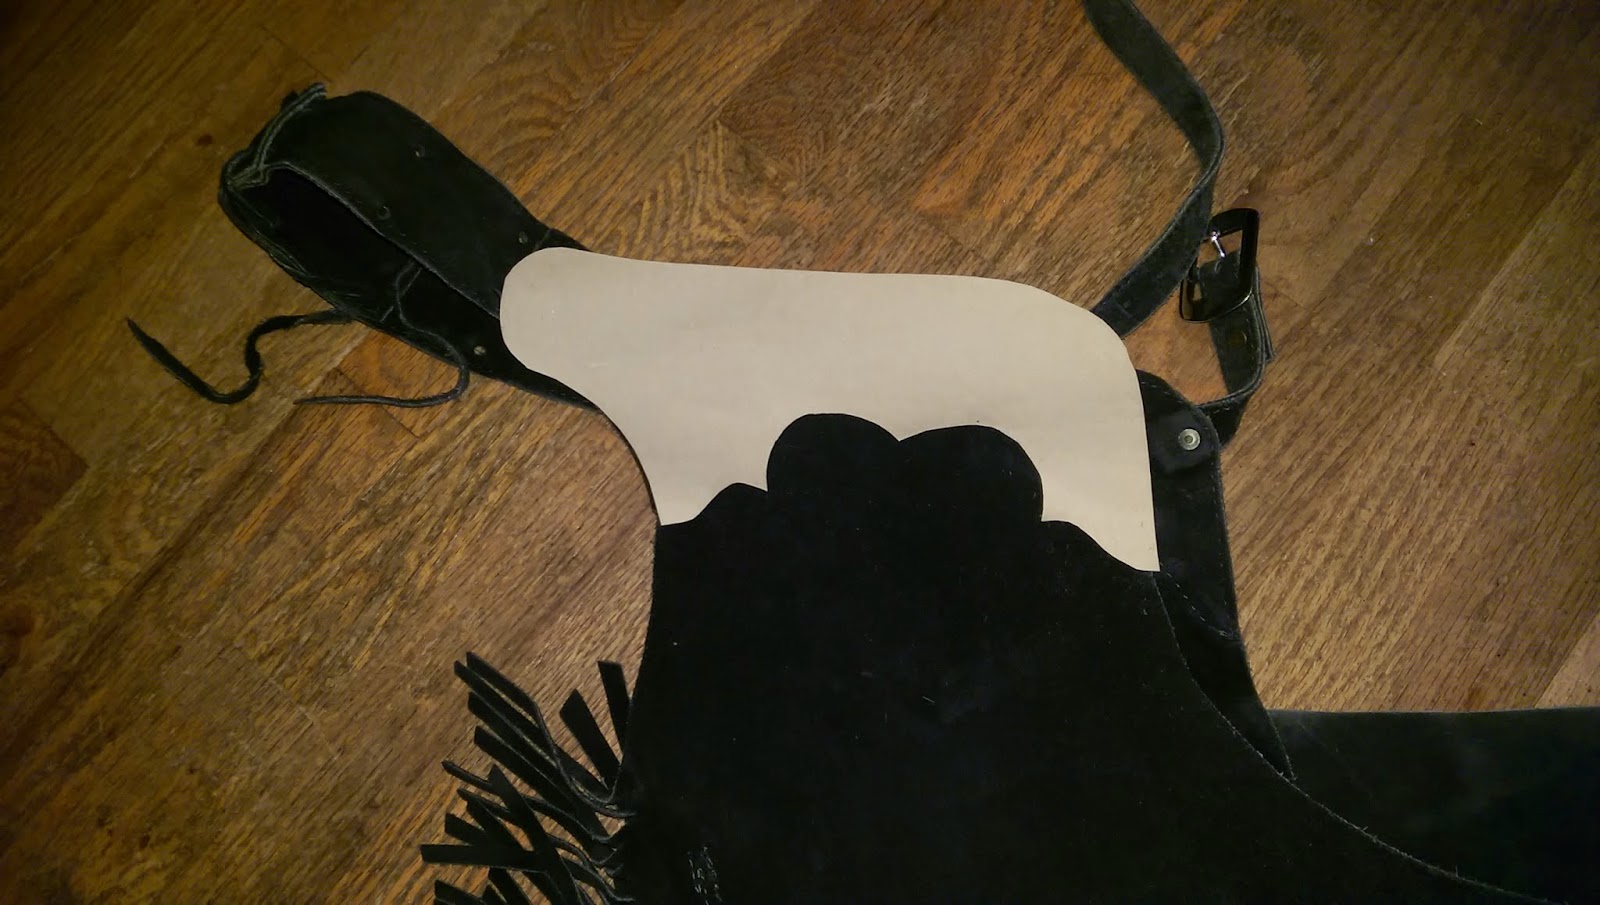
The original yoke and belt. The wide belt goes at the back, and the thinner one buckles in front. Very adjustable, but not very fancy or interesting.


The pattern I made for the yokes, based on the original ones but with a few extra swirls and swoops to make it more eye-catching and, I think, feminine.


The yokes cut from tooling leather. In this pic I've only beveled the edges on the bottom one, and you can compare to see how this slight detail gives the piece a more finished appearance.


This was only the second time I'd ever used my basketweave stamp. It worked up pretty easily once I got the trick of it, and it looks nice!


Basketweave done and the design edge finished with a rainbow-esque cam tool. Looking pretty good. I'm starting to think this will turn out better than I hoped.


Both yoke pieces done. Then I cut a two inch strap for the back belt. I rounded the edges, beveled and stamped it, adding a monogram in the middle to personalize it.


The yoke pieces will be sewn on, and the back belt will attach to them with conchos. This will add for extra adjustment, if needed, as well as looking fancy. (I don't have the conchos yet.)


First coat of dye. It's still damp and a little uneven, but a second coat will fix that. Also, the lighting in the shop and my flash play havoc with the appearance of surfaces. I'm no professional photographer, alas! The color I chose is Lincoln Leather Dye's "Brown". Crazy name!


Glued in place with contact cement. You can see the tiny front belt I made. It's riveted in place, and the stitching on the edge of the leather will hold it even more firmly.


Concho hole punched, and the stitching begins. I have a piece of thick felt to keep the leather from getting scratched by the wooden stitching pony. I used black waxed heavy thread. Stitching leather by hand is slow work for me, but the look and quality is worth it.


Finished! Still need those conchos on the back, but then they go for their first ride on Wednesday.  I've already got ideas of how I want to to do another pair, yikes!

Wednesday, January 14, 2015

insert foot pun here

Hobbit feet are hairy and thick-soled, and therefore hobbits don't wear shoes. Tolkien never said that Hobbit feet were big, except in the case of the Proudfoot family line, but artists have often drawn them with large feet and it's become a bit of an accepted fact.

I was okay with going barefoot to the party until the temperatures took a serious dip into the low 30s (zero Celsius!) , and then I decided I needed something to keep warm. A quick trip to the fabric shop and four dollars later, I had a sizeable piece of beige fleece from the remnant bin. Now, how was I going to make it into suitable feet?

It's the sort of thing that literally keeps me awake at night. I lie there in the dark and mentally fold and pin and stitch and amend until it's three am and I have a plan. I wanted something that looked right but wouldn't take forever to make, because time was short. I searched the internet and found something similar to what I had in mind, so with that idea and my own combined, I came up with this:

To make the pattern, place your bare foot onto paper and draw the shape of your Hobbit foot. I didn't go so much for big as I did long.  Cut two layers for each foot and stitch them all the way around. Yep, all the way.


Now make sure that you have a right and a left foot! Then carefully cut an opening in the top only of each foot, starting about an inch and a half from the heel and about four inches long, and turn the feet inside-out so the seams are hidden inside. Go ahead and stick your feet in them to check the fit. Fleece is nice because there's a lot of stretch and give to it. I cut the openings in mine a little more oval-shaped to give a better fit. All good so far? Okay.  Take the feet off and put a little stuffing in the toes and toe area.

Now you need a pair of socks. I got some mis-matched ones from the lonely sock bin in the laundry room. Put them on, and pull your Hobbit feet on over them. Add stuffing where needed to make a nice foot. I didn't put any underneath my foot or on the sides, just mostly around the toe and front of the foot to make it look right. Smooth out any lumps and when you're happy with how they look, pin (carefully!) the fleece to the ankle of your sock and gently remove your foot, leaving the sock as a lining in the Hobbit foot.

I'm sorry I didn't get pictures of the in-between steps. I get busy and I think I'll do it later, and then.. well.

I used a one-inch strip of fleece stitched around to cover the raw edges of the foot and sock. My husband felt like it was too loose and so I made his binding a little wider and added a strip of elastic in it to help the feet feel more secure. I found hand stitching to be easiest for this part.

A little fake fur stitched on the arch finished my feet. I think they look pretty good!


I didn't put on toenails because I thought they looked creepy. Your mileage may vary.

If I had more time, and this was for a proper cosplay event, I'd have taken more care with sculpting the toes and other details. I would have hand-tufted the foot hair to make it look a little more natural, and I'd have put a leather sole on the bottom for longer wear.  But for a one-time party, I think they'll do nicely!

Oh, and here's a picture of us both in our full Hobbit regalia! What am I looking at? Who knows, haha -- it's not a great snap of me, but as usual, my hubby looks great.