My favorite secondhand building materials place came through again, and most unexpectedly; we were shopping for a mailbox but couldn't pass by this four-poster bed frame. It was nicely carved and the price of $300 had been dropped to $150. We both stopped with an "Ooooh!" of admiration.
We dithered for a while -- no, wait, that's not true. I dithered. Dave was ready to get it but left the final decision to me, as I'd be the one doing the work of refinishing it. I knew it was well worth the asking price; it was solid wood, mahogany probably. The finish was scraped and worn. With a little work, it would be a beautiful piece.
But did I want to do that work?
Then a clerk came by and told us all beds were on sale at 50% off the lowest marked price. So that meant the bed was selling for only $75. Load it up, boys -- we're taking it home.
It doesn't look too impressive here, in the garage with a shelf of horse blankets behind it, but that's because the corner posts are in sections and the upper halves are removed. See that nice inlay work around the edge? And those post are hand carved!
Behold the hand carved post! If you are observant, this picture gives a clear indication of "not as old as you might think". I didn't see it at first, but once I learned more about our bed, it was obvious. See the black flecks spattered on the finish? That's called "flyspecking" and it's been a popular technique for the last 75 years or so to make an item look older. It's gross to think about, but somewhere in history, a carpenter thought, "All the stuff I'm building looks too new. If only I could make it look like it had been around for years with flies pooping on it. Then I bet people would buy it!" and that carpenter was right. You'll never look at your grandma's china cabinet the same way, will you?
Fortunately for me, those flyspecks come right off with the old finish. Faux flyspecks are for chumps; I want the real thing! (Actually, no, I do not want any fly poop anywhere, ever.)
Here's the before-and-after of stripping off the old finish. Once everything is naked, I'll use mahogany stain and a coat of tung oil to finish.
The finials are a separate piece, which is nice since one of them had broken at a thin point and been clumsily and crookedly repaired with what felt like rubber cement. Yuck! I peeled and scraped off all the old glue --completely forgetting to take a "before" picture because I was in the zone. A little wood glue and some filler, sand when dry, and you'd never know there was a fracture.
So wait-- I can hear you asking, What's this about a rice bed?
Of course you know I was doing research on this bed as soon as we got it home. I looked up "bed with wheat carving" on Google, and learned that the carving actually portrays rice, not wheat. Rice was a popular crop in the southern states -- who knew? -- along with tobacco, and so rice became a common motif for furniture in the 1800s, most particularly on bed frames which were called "Rice Beds".
Because of the flyspecking, I knew this bed wasn't from the 1800s, but Rice Beds are still made to this day. I looked at all kinds of pictures to find the exact pattern and style of ours, and I'm quite confident that ours was made in the 70s by Councill. They are still in business and have a reputation as one of the finest furniture makers in America. Ours doesn't look exactly like their latest catalog item, but it's a perfect match for ones I've found on furniture auction and resale sites. Original retail price: $5000 to $7000.
Not a bad bargain for $75.
Stay tuned for the full "after" pictures. It'll be a while, but it'll be worth it!
Tuesday, July 25, 2017
Monday, May 15, 2017
Leather Quickie!
I have a stethoscope and veterinary thermometer in my grooming tote as part of my first aid kit. Up until last week, I kept my 'scope in a sock to keep it clean and somewhat protected. Then I got bored one night and in an amazingly short amount of time I made a nice little leather case -- and practiced my leather carving skills at the same time. It was so quick, I didn't get any in-process pictures taken, except one before I stitched the edges and one after.
The whole project is just a square of leather folded over like a book, leaving one inch as a "spine". I cut in and tooled a commercial design of a flower and horse head, and then did a background of stamped basketweave and a half-round camo border. I left the back plain; no need to get overly ambitious. A few yards of 1/8" leather lacing made a nice finish for the raw edge, and also stitched in a heavy-duty zipper around the three sides.
If I had wanted to get super fancy, I could have glued in a shearling lining, and some elastic loops or similar to hold my scope and thermometer in place, but I think it's perfectly acceptable the way it is. And much better than a sock.
![]() |
| Before lacing around the edge. |
If I had wanted to get super fancy, I could have glued in a shearling lining, and some elastic loops or similar to hold my scope and thermometer in place, but I think it's perfectly acceptable the way it is. And much better than a sock.
![]() |
| The lacing completed. Oh my goodness, it's so blurry. Well. you get the idea, anyway. |
Sunday, March 26, 2017
Imp's Birthday
It's not every year your horse turns 20, and I felt like Imp deserved more than just an extra carrot or apple on his big day (though of course he'll get those, too!) so I decided it was time to make a special gift -- and learn a new skill at the same time.
I've been making stuff from leather for a few years, and I have a growing set of leather stamps that I've used to create designs on some of the things I make. But I've always admired the way some folks carve flowers, leaves, and other pictures on to leather -- Sheridan carving is one name for it. I watched a few videos on YouTube that made it look easy and I already had the tools, so I hauled out my box of leather pieces and made some beginner efforts.
There on the left, you see my first scribbles and scratches. It was pretty ghastly. I tried sharpening my knife again --really well, this time, not just a few passes -- and it helped a little. By the next evening, with a little more practice, I managed the sample on the right. It;s a huge improvement, but still pretty awful compared to what it should be. But those guys in the YouTube videos have a couple decades of experience so I'm not gonna be too hard on myself. This is perfectly good for only a few hours practice.
I picked out a design and some lettering and transferred it to my prepared leather. Cutting it in with my swivel knife took about an hour and my hand was cramped. I grip way too tight when I concentrate. I have real problems with spirals and tight corners, and this design was full of them, but I so liked the look of it that I decided I'd go for it. So here it is, all cut in. From a distance, it's not too shabby!

Now, I have to bevel the edges to give it that look of depth. In the professional videos, the guy just scooted his beveler along between taps of his mallet, so smooth and easy and pretty. Mine hopped and bucked and went astray a few times, and again, I was probably gripping too tight and trying to hard to work it along. My beveling is the perfect match for the "wrong" example I saw in a book; all bumpy and uneven. Alas!
It took me about two hours to get the beveling done, and the shading around the letters. Doesn't that font look like it should say "Holy Bible"? But it's a very typical example and one of the only lettering templates I had in my collection. It looks awesome.

A little bit of shading and some various stamps used here and there, and I'm satisfied with my work. It's doesn't look too awful. In fact, from a barn aisle viewing distance of about five feet, it looks pretty darn good. Especially if you squint.
I painted Imp's name in black dye, and then put on a coat of "Light Brown" that turned out pretty darn dark. I should have maybe not done the second coat. Oh well. Rich dark color makes it look expensive and professional. Right? Sure.
Cut to fit and nailed to a scrap of cedar with some fancy upholstery tacks, and I've made pretty much the nicest stall sign I've ever seen. I'm sure Imp will give a snort of delight when I hang it on his stall tomorrow.
I've been making stuff from leather for a few years, and I have a growing set of leather stamps that I've used to create designs on some of the things I make. But I've always admired the way some folks carve flowers, leaves, and other pictures on to leather -- Sheridan carving is one name for it. I watched a few videos on YouTube that made it look easy and I already had the tools, so I hauled out my box of leather pieces and made some beginner efforts.
There on the left, you see my first scribbles and scratches. It was pretty ghastly. I tried sharpening my knife again --really well, this time, not just a few passes -- and it helped a little. By the next evening, with a little more practice, I managed the sample on the right. It;s a huge improvement, but still pretty awful compared to what it should be. But those guys in the YouTube videos have a couple decades of experience so I'm not gonna be too hard on myself. This is perfectly good for only a few hours practice.
I picked out a design and some lettering and transferred it to my prepared leather. Cutting it in with my swivel knife took about an hour and my hand was cramped. I grip way too tight when I concentrate. I have real problems with spirals and tight corners, and this design was full of them, but I so liked the look of it that I decided I'd go for it. So here it is, all cut in. From a distance, it's not too shabby!

Now, I have to bevel the edges to give it that look of depth. In the professional videos, the guy just scooted his beveler along between taps of his mallet, so smooth and easy and pretty. Mine hopped and bucked and went astray a few times, and again, I was probably gripping too tight and trying to hard to work it along. My beveling is the perfect match for the "wrong" example I saw in a book; all bumpy and uneven. Alas!
It took me about two hours to get the beveling done, and the shading around the letters. Doesn't that font look like it should say "Holy Bible"? But it's a very typical example and one of the only lettering templates I had in my collection. It looks awesome.

A little bit of shading and some various stamps used here and there, and I'm satisfied with my work. It's doesn't look too awful. In fact, from a barn aisle viewing distance of about five feet, it looks pretty darn good. Especially if you squint.
I painted Imp's name in black dye, and then put on a coat of "Light Brown" that turned out pretty darn dark. I should have maybe not done the second coat. Oh well. Rich dark color makes it look expensive and professional. Right? Sure.
Cut to fit and nailed to a scrap of cedar with some fancy upholstery tacks, and I've made pretty much the nicest stall sign I've ever seen. I'm sure Imp will give a snort of delight when I hang it on his stall tomorrow.
Happy 20th Birthday, Imp!
Sunday, February 5, 2017
A Clean Machine. Sort of.
A quick wipe with a damp rag to take off the top layer of dust didn't go far to improving the old girl's looks, alas.
I was pretty sure that Gojo would melt away most of the dirt, though it meant being careful around the decorative decals. So I slathered that on and let it sit for about twenty minutes. Unfortunately, when I wiped it off, nothing had changed. There was a layer of dried gummy dirt that would not budge. I tried rubbing it with oil, I tried automotive bug and tar remover, I tried castile soap and a soft toothbrush, I tried 409 -- nothing was working! What was the deal? What was this stuff, and how was it resisting all the usual tried-and-true cleaning methods? Finally I tried straight 70% isopropyl alcohol -- rubbing alcohol from the supermarket. And it worked! It also wanted to take the decals off, so I had to work carefully around them, removing as much dirt as I could without stripping the gold and color from the decoration.
The greenish-brown nastiness I was taking off was something I had seen before -- smoke residue. I imagined the machine set up in a room with a wood-burning stove, a man with a pipe, a 1970's two-pack-a-day chainsmoker-- over a century, I suppose it was possible that this sort of gunk could accumulate.
She won't win any beauty contests. There's decal damage from wear (and I admit there's a place or two where I scrubbed a little too aggressively) and there are places where rust has damaged the finish, but she's clean, and once I give her a coat of carnuba wax, she'll look okay. She shows her age and history, and there's nothing wrong with that; she's earned it!
This is me, trying all kinds of crazy stuff to clean various parts. If you look in the middle of the machine there, right under the decals, you can see a metal part that's kinda rounded. That's a little device that helps set the thread tension. It was all wiggly-jiggly and loose, so I took it off to see what the issue was. I couldn't see any way to tighten it, so I got my owner's manual out. No info there. So I checked out a treadle website I knew was reputable, and there I read the horrifying news: 'Don't disassemble the White tension system! This assembly rarely gives trouble and shouldn't be messed with. Reassembly and calibration requires a tool you don't have -- because you have to make it yourself.'
Good heavens! Had I just wrecked this machine? I got up and walked away from my work to take a few deep breaths.
Then I had a drink of water.
Then I went to bed.
By the next night, I had talked my courage back up. The part was obviously not working as intended even before I had taken it off. I had not broken the machine-- it had already been that way, and if I couldn't put it right, that was not my fault. But maybe I could fix it. I am nothing if not creative. Shoot, making a tool? That sounded right up my alley. I rolled up my sleeves and took off the face plate.
I had to really read carefully to decipher what the author was describing, but once I got a good look at it, I could see immediately what the problem was, and it was just a matter of using a screwdriver and a needle-nose pliers to tuck a piece into place. I got the face plate back on and gave the handwheel a little turn. Nothing fell off, there were no screeching noises or clunks, and everything seemed to move as it should.
Whew!
It was time to put the machine back into the cabinet and she how she works. I cut a new belt from an old leather rein, made a few adjustments to get the length just right, and gave the handwheel a turn --
If the technology worked, you should be seeing a video of that beat up machine running swift and smooth, making the tiniest, evenest stitches ever. I didn't even have to adjust the tension (something I spent two days messing with on my New Home machine, Julia, when I got her) and I'm beyond pleased with the results. Hooray for not breaking the tension system!
Now to get to work on refinishing the cabinet!
I was pretty sure that Gojo would melt away most of the dirt, though it meant being careful around the decorative decals. So I slathered that on and let it sit for about twenty minutes. Unfortunately, when I wiped it off, nothing had changed. There was a layer of dried gummy dirt that would not budge. I tried rubbing it with oil, I tried automotive bug and tar remover, I tried castile soap and a soft toothbrush, I tried 409 -- nothing was working! What was the deal? What was this stuff, and how was it resisting all the usual tried-and-true cleaning methods? Finally I tried straight 70% isopropyl alcohol -- rubbing alcohol from the supermarket. And it worked! It also wanted to take the decals off, so I had to work carefully around them, removing as much dirt as I could without stripping the gold and color from the decoration.
The greenish-brown nastiness I was taking off was something I had seen before -- smoke residue. I imagined the machine set up in a room with a wood-burning stove, a man with a pipe, a 1970's two-pack-a-day chainsmoker-- over a century, I suppose it was possible that this sort of gunk could accumulate.
Then I looked at the condition of the cabinet, with it's water-damaged veneer, rippled and cracking, and I thought maybe there was a house fire. This machine could tell some stories, I bet!
I stripped off the metal parts and scrubbed off the residue and rust as best I could. A little spritz of solvent degreaser on the works underneath and a wipe with a lint-free cloth got that cleaned up nicely. I oiled the parts and then added a dab of heavy duty silicone lubricant if things still seemed a bit tight.
She won't win any beauty contests. There's decal damage from wear (and I admit there's a place or two where I scrubbed a little too aggressively) and there are places where rust has damaged the finish, but she's clean, and once I give her a coat of carnuba wax, she'll look okay. She shows her age and history, and there's nothing wrong with that; she's earned it!
This is me, trying all kinds of crazy stuff to clean various parts. If you look in the middle of the machine there, right under the decals, you can see a metal part that's kinda rounded. That's a little device that helps set the thread tension. It was all wiggly-jiggly and loose, so I took it off to see what the issue was. I couldn't see any way to tighten it, so I got my owner's manual out. No info there. So I checked out a treadle website I knew was reputable, and there I read the horrifying news: 'Don't disassemble the White tension system! This assembly rarely gives trouble and shouldn't be messed with. Reassembly and calibration requires a tool you don't have -- because you have to make it yourself.'
Good heavens! Had I just wrecked this machine? I got up and walked away from my work to take a few deep breaths.
Then I had a drink of water.
Then I went to bed.
By the next night, I had talked my courage back up. The part was obviously not working as intended even before I had taken it off. I had not broken the machine-- it had already been that way, and if I couldn't put it right, that was not my fault. But maybe I could fix it. I am nothing if not creative. Shoot, making a tool? That sounded right up my alley. I rolled up my sleeves and took off the face plate.
I had to really read carefully to decipher what the author was describing, but once I got a good look at it, I could see immediately what the problem was, and it was just a matter of using a screwdriver and a needle-nose pliers to tuck a piece into place. I got the face plate back on and gave the handwheel a little turn. Nothing fell off, there were no screeching noises or clunks, and everything seemed to move as it should.
Whew!
It was time to put the machine back into the cabinet and she how she works. I cut a new belt from an old leather rein, made a few adjustments to get the length just right, and gave the handwheel a turn --
Okay, I'm trying to load a video from my phone. I hope this works....
If the technology worked, you should be seeing a video of that beat up machine running swift and smooth, making the tiniest, evenest stitches ever. I didn't even have to adjust the tension (something I spent two days messing with on my New Home machine, Julia, when I got her) and I'm beyond pleased with the results. Hooray for not breaking the tension system!
Now to get to work on refinishing the cabinet!
Friday, January 6, 2017
A New Beginning
About a month ago, I saw a treadle machine at my favorite thrift shop. It was in terrible shape: the head was black with filth and all the silver parts were rusty. The wood veneer on the cabinet was warped and rippled with water damage, and the whole thing had been sloppily painted over with cream-colored paint on the body and black paint sprinkled with glitter for the top. I ached for the noble, purposeful machine it once was, now reduced to a tatty has-been. Then I saw the price tag --$159.
One hundred and fifty-nine dollars!
I called over a clerk. "People buy something like this for two reasons; they want to use it for sewing, or for decoration. As it stands now, this piece is neither useful nor decorative without a lot of work. This machine in good condition might be worth what you're asking, but as it is? You're asking far too much."
She was chewing gum. "I'll let the manager know," she said.
As I walked away, I knew she wasn't going to say anything. I bet they get people saying things like that all the time. I've worked in retail. I'm sure I was coffee break conversation that day, greatly exaggerated to look foolish, duh duh duhhhh.
I saw it sitting there-- sometimes open to show the grimy machine, sometimes closed-- for a few weeks before I tried again. I asked another clerk what happens to the furniture items that don't sell. Sometimes they get donated, sometimes hauled to the dump or recycling center. I saw a bleak future for the treadle.
The day before Christmas, I saw that someone had tied a red ribbon on the spool spindle, and there was a tiny fake potted evergreen tree sitting on the open cabinet lid. Somehow this made me feel even worse about the machine's prospects.
The best I could hope for was a half-price day, when all the tags of a certain color are marked down. But even that would only drop the price to $80-- still far too much. I collared another clerk and asked to speak to the manager of the day. (Yeah, I don't understand how that works, either, but hey, I don't work there, so...) She arrived, and I once again began my pitch about the two reasons, how age plus dirt does not equal value, the amount of work needed to make this thing useful or decorative. She was working hard at looking interested, I'll give her that. "Could I make an offer?" I asked. She shrugged. I handed her my business card. "If no one buys it and it's headed to the dump, I will pay $25. Please call me."
"Yeah, okay." She pocketed my card and I left knowing she was not going to call me. I was just a weird lady who didn't want to pay full price for something.
Sometimes the shop has 99 cent days, when all the tags of a certain color are marked down. It's the last effort to clear them out before they are culled. I wasn't sure if furniture was included in that sale, but I decided that was my opportunity. So I waited and checked and watched for that sale day.
Then about a week ago, I stopped by the thrift shop to see if it was 99¢ day for green tags so I could spring that sorry-looking treadle. This guy comes over after watching me for a minute. "I've seen you here looking at this a couple times now," he says.
"I'm keeping an eye on it," I explain. "I want it, but not at the asking price."
He watches me open up the machine. "How much would you pay?" He asks.
"I think $25 is fair, but that's way less than the tag."
He turns over the tag. $159. "This tag? This tag is wrong." He takes out a sales pad. "That's supposed to say $59." He smiles. "Oh-- and green tags are half off. That makes it $29.50."
"What." I am stunned.
"Shall I write it up?" He winks at me.
"Wow, that's--"
"A neat way to start a new year? I agree."
So I brought her home.
One hundred and fifty-nine dollars!
I called over a clerk. "People buy something like this for two reasons; they want to use it for sewing, or for decoration. As it stands now, this piece is neither useful nor decorative without a lot of work. This machine in good condition might be worth what you're asking, but as it is? You're asking far too much."
She was chewing gum. "I'll let the manager know," she said.
As I walked away, I knew she wasn't going to say anything. I bet they get people saying things like that all the time. I've worked in retail. I'm sure I was coffee break conversation that day, greatly exaggerated to look foolish, duh duh duhhhh.
I saw it sitting there-- sometimes open to show the grimy machine, sometimes closed-- for a few weeks before I tried again. I asked another clerk what happens to the furniture items that don't sell. Sometimes they get donated, sometimes hauled to the dump or recycling center. I saw a bleak future for the treadle.
The day before Christmas, I saw that someone had tied a red ribbon on the spool spindle, and there was a tiny fake potted evergreen tree sitting on the open cabinet lid. Somehow this made me feel even worse about the machine's prospects.
The best I could hope for was a half-price day, when all the tags of a certain color are marked down. But even that would only drop the price to $80-- still far too much. I collared another clerk and asked to speak to the manager of the day. (Yeah, I don't understand how that works, either, but hey, I don't work there, so...) She arrived, and I once again began my pitch about the two reasons, how age plus dirt does not equal value, the amount of work needed to make this thing useful or decorative. She was working hard at looking interested, I'll give her that. "Could I make an offer?" I asked. She shrugged. I handed her my business card. "If no one buys it and it's headed to the dump, I will pay $25. Please call me."
"Yeah, okay." She pocketed my card and I left knowing she was not going to call me. I was just a weird lady who didn't want to pay full price for something.
Sometimes the shop has 99 cent days, when all the tags of a certain color are marked down. It's the last effort to clear them out before they are culled. I wasn't sure if furniture was included in that sale, but I decided that was my opportunity. So I waited and checked and watched for that sale day.
Then about a week ago, I stopped by the thrift shop to see if it was 99¢ day for green tags so I could spring that sorry-looking treadle. This guy comes over after watching me for a minute. "I've seen you here looking at this a couple times now," he says.
"I'm keeping an eye on it," I explain. "I want it, but not at the asking price."
He watches me open up the machine. "How much would you pay?" He asks.
"I think $25 is fair, but that's way less than the tag."
He turns over the tag. $159. "This tag? This tag is wrong." He takes out a sales pad. "That's supposed to say $59." He smiles. "Oh-- and green tags are half off. That makes it $29.50."
"What." I am stunned.
"Shall I write it up?" He winks at me.
"Wow, that's--"
"A neat way to start a new year? I agree."
So I brought her home.
Wednesday, December 14, 2016
Silly Wintertime Fun
I'm a weirdo about my bears, I admit it. There's just something about hugging a good teddy bear that just soaks up all your worries and frets. Because they provide such a helpful service, I express my thanks in silly gifts for them.
Hugh is a newer bear, but boy what a super bear he is. I found him at thrift (of course!) for only four dollars. I picked him up and was just putting him back down when he sighed unhappily. He has a working "growler" inside him! After my initial surprise, I was delighted. It wasn't long before he became my couch buddy.
He has no tags, but he has a striking resemblance to a 1920's Steiff bear. With no button in his ear, it's hard to prove his pedigree, but his large size (24"), rare color, and outstanding condition including working growler make him quite a valuable bear to collectors. I just think he's a great guy, and don't really care about collector value.
I got him a little fisherman sweater and that was very cute on him, but a few days ago I decided what he really needed was some sleepwear. It's winter, and that means hibernation, right? And because it was so quickly thought of, naturally I didn't take any in-process pictures. It was cold an rainy out and I was really just indulging in some "sewing therapy" to improve my mood. Anyway here's the results:
The nightshirt is blue striped cotton with pink binding on the edges. A little pearl button and a yarn loop make the neck closure.
Hugh's bathrobe is soft blue wool with a bit of grey and white twist yarn to make the piping and belt. His pocket holds a red and blue striped cotton handkerchief in case of sniffles.
The finishing touch is his Victorian-style smoking cap, made from a piece of wool leftover from the robe and a wide band of ribbon. A silver and pearl button and cotton floss tassel top it off with style.
Now all he needs is a tiny pipe and some reading glasses and he's all set to spend the winter season in comfort.
I'll have more things to share after the holidays when the recipients have gotten their gifts and I won't spoil anything by showing them here. Until then, I hope your days are merry and bright, and all good things come your way!
Hugh is a newer bear, but boy what a super bear he is. I found him at thrift (of course!) for only four dollars. I picked him up and was just putting him back down when he sighed unhappily. He has a working "growler" inside him! After my initial surprise, I was delighted. It wasn't long before he became my couch buddy.
He has no tags, but he has a striking resemblance to a 1920's Steiff bear. With no button in his ear, it's hard to prove his pedigree, but his large size (24"), rare color, and outstanding condition including working growler make him quite a valuable bear to collectors. I just think he's a great guy, and don't really care about collector value.
I got him a little fisherman sweater and that was very cute on him, but a few days ago I decided what he really needed was some sleepwear. It's winter, and that means hibernation, right? And because it was so quickly thought of, naturally I didn't take any in-process pictures. It was cold an rainy out and I was really just indulging in some "sewing therapy" to improve my mood. Anyway here's the results:
The nightshirt is blue striped cotton with pink binding on the edges. A little pearl button and a yarn loop make the neck closure.
Hugh's bathrobe is soft blue wool with a bit of grey and white twist yarn to make the piping and belt. His pocket holds a red and blue striped cotton handkerchief in case of sniffles.
The finishing touch is his Victorian-style smoking cap, made from a piece of wool leftover from the robe and a wide band of ribbon. A silver and pearl button and cotton floss tassel top it off with style.
Now all he needs is a tiny pipe and some reading glasses and he's all set to spend the winter season in comfort.
I'll have more things to share after the holidays when the recipients have gotten their gifts and I won't spoil anything by showing them here. Until then, I hope your days are merry and bright, and all good things come your way!
Friday, October 28, 2016
Look at my chest!
There's this great little shop on our west side that sells building materials and fixtures pulled from old construction. If you want old kitchen cabinets to put in your garage for storage, if you're looking for a mid-century formica table, or if you need a moth-eaten, horsehair stuffed velvet Victorian fainting couch, there's a good chance you'll find it there.
Guess who loves going there.
I'll give you three guesses.
Me, me, and ME.
It's where we found that terrific chandelier that we're so pleased about. We got our bathroom floor tile there. I got a complete socket wrench set for a dollar! And they always have some crazy thing that makes you tilt your head on one side and wonder where it came from, and where it'll end up -- like the twenty foot long marble bar from a hotel built in the 1890s. That thing was gorgeous. There was a note saying that a skunk had built a den in one of the cupboards at one time, which would explain the lingering aroma. It was only $500. I did a fair bit of covetous petting and cooing, but simply put, there's no place in our house that it would have fit, and of course we have no use for such a thing. It was pretty, though.
I've been poking around there, hoping a piano stool will show up that I can use with my treadle. No luck so far, but last week we did find something. And it was marked down a lot, which was a big treat.
We got a pretty waterfall-front cedar chest from the 1930s for only $25. Originally it was priced at $125, so we felt like we got a good deal.

With the holidays coming up, I'm going be busy at work and a lot of my creative time is going to be spent working on super-secret gifts, so there may not be much to see here. I'll try to update as often as I can. Until then...
Stay tuned for more pictures of my chest!
Guess who loves going there.
I'll give you three guesses.
Me, me, and ME.
It's where we found that terrific chandelier that we're so pleased about. We got our bathroom floor tile there. I got a complete socket wrench set for a dollar! And they always have some crazy thing that makes you tilt your head on one side and wonder where it came from, and where it'll end up -- like the twenty foot long marble bar from a hotel built in the 1890s. That thing was gorgeous. There was a note saying that a skunk had built a den in one of the cupboards at one time, which would explain the lingering aroma. It was only $500. I did a fair bit of covetous petting and cooing, but simply put, there's no place in our house that it would have fit, and of course we have no use for such a thing. It was pretty, though.
I've been poking around there, hoping a piano stool will show up that I can use with my treadle. No luck so far, but last week we did find something. And it was marked down a lot, which was a big treat.
We got a pretty waterfall-front cedar chest from the 1930s for only $25. Originally it was priced at $125, so we felt like we got a good deal.
Doesn't look like much, does it? But it's the perfect thing to put at the foot of our bed to hold spare sheets and blankets. Right now we're using a small wooden entryway bench that used to be our son's toybox. This is a nice upgrade. And it'll be even nicer once I've refinished it.
It wasn't until we were loading it into the car and the bottom suddenly slid halfway out that we realized that part is a drawer! You can just see the two holes where a handle used to be. I ran a scrap of leather thong through it as a temporary handle. We were hoping to find a treasure map or envelope of valuable stock certificates taped to the underside, but no such luck. Alas!
The veneer is pulling up but I'm sure a little wood glue and a warm iron will fix that.
I was worried there was damage to the top because it was all rough and scratched, but nope, just the finish crackling and flaking off. I did some scrubbing with refinisher and you can see a difference already. Left side cleaned, and right side old and icky. I have very bright lighting in my workshop, so all the warm wood tones are washed out in my pictures, but I hope you can see what I do -- this cheap little secondhand chest is going to clean up very nicely.

With the holidays coming up, I'm going be busy at work and a lot of my creative time is going to be spent working on super-secret gifts, so there may not be much to see here. I'll try to update as often as I can. Until then...
Stay tuned for more pictures of my chest!
Wednesday, October 19, 2016
Catch up! Catch up!
A month! It's been a month since I updated! Would it make you feel better if I said it was because I was so busy doing awesome things, and I had pretty pictures to show you? I thought so. Here we go.
First of all, Steamposium. We decided on a hunter/explorer theme for our outfits this year, and I'll admit there wasn't a lot of sewing involved with that; we mostly used clothing elements we already had, and I got two pith helmets at thrift. I made Dave a new cravat, though. I had the perfect scrap of fabric in my stash and he was very pleased with the result.
I needed a proper exploring skirt that would stand up to travel and hard wear, protecting me as I slashed my way through jungle trails and whatnot. Simple cotton duckcloth was the perfect stuff, and I was pleased to remember an old piece that I could rework. The original dress is kind of embarrassing now, but the fabric was spot-on and it's not like I was going to wear the lace-up canvas viking tent anywhere. All it took was cutting off the bodice area and making it the right skirt length. A simple waistband, belt loops, a few buttons (purely decorative) and kerblammers -- adventure skirt ahoy! I thought about putting some deep patch pockets on it, but then I'd load them up with things, and I'd look all lumpy.

Why is there a canary in a cage on my belt? I thought perhaps my traveler had a mistaken notion that birds could sense danger. Perhaps she had heard about birds being taken into mines (where they alerted workers of dangerous gas by, well, dying) but had not understood exactly what the birds did or why. I named my feathery companion "Caruso" and occasionally would lift his cage, peer at him closely, then announce "He's good. We're okay."
It would have been quite funny to have him wearing a tiny gas mask and with a sign tucked under his wing saying "You're fine!"
I know you're wondering about the blue wig, right? That... did not turn out well. Like, at all. No matter how many times I rinsed and rinsed, it still insisted on turning my forehead and hands blue when I put it on. I finally scrapped my idea for it and just did my hair in a kind of rolled ponytail tucked thingy. No pictures because it wasn't awesome and I didn't feel right about myself. I mean, I had a good time anyway, but next time I need to give myself more time for Plan B Hair, I guess.
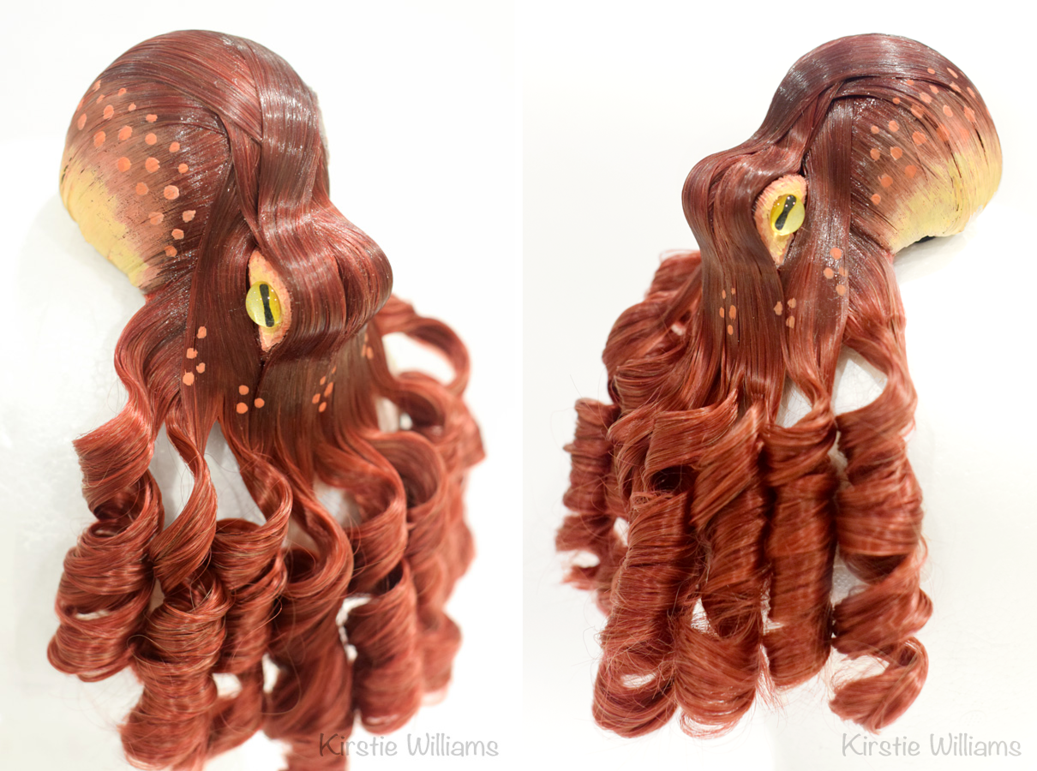
But what had I planned to do with the blue wig? Well. I was thinking it could look sort of ocean-like, wavy and blue, right, and then I'd use a tiny wig I had to make an octopus to put on top like a bun.

I had the idea in my head, but I wasn't sure if it would work. Then I saw this picture online and was like Yes, I can do that!
So I took my little wig and dyed it fuschia, and a wooden spool seemed about right, with two buttons, to make octopus eyes.
The plan was going along just fine. It might not have looked exactly like the picture, thanks to my nascent hair styling skills, but it would have been all right, I think. But there was no dealing with the blue forehead and hands, not to mention it would probably transfer to my clothing and anything I leaned against (like Dave's shoulder) and oh, my neck and shoulders, too. Here's my start to an octopus, though. I've got his eyes set wrong, like a cat's. Oh well.
He looks kind of flat, compared to the inspiration picture. Well, this is how we create. Not everything works out.
So that was Steamposium and we had a great time and I ate too many gummi peach candies and Dave got invited to pose for a steampunk calendar and they'll be in touch. I was not invited to be in the calendar. I blame this on my lack of hairstyling skills and not having a fancy mustache like Dave does. So I guess I'm okay with that. Lip hair is just more hair to style, argh.
First of all, Steamposium. We decided on a hunter/explorer theme for our outfits this year, and I'll admit there wasn't a lot of sewing involved with that; we mostly used clothing elements we already had, and I got two pith helmets at thrift. I made Dave a new cravat, though. I had the perfect scrap of fabric in my stash and he was very pleased with the result.
I needed a proper exploring skirt that would stand up to travel and hard wear, protecting me as I slashed my way through jungle trails and whatnot. Simple cotton duckcloth was the perfect stuff, and I was pleased to remember an old piece that I could rework. The original dress is kind of embarrassing now, but the fabric was spot-on and it's not like I was going to wear the lace-up canvas viking tent anywhere. All it took was cutting off the bodice area and making it the right skirt length. A simple waistband, belt loops, a few buttons (purely decorative) and kerblammers -- adventure skirt ahoy! I thought about putting some deep patch pockets on it, but then I'd load them up with things, and I'd look all lumpy.
![]() |
| I have pretty jewels! |

It would have been quite funny to have him wearing a tiny gas mask and with a sign tucked under his wing saying "You're fine!"
I know you're wondering about the blue wig, right? That... did not turn out well. Like, at all. No matter how many times I rinsed and rinsed, it still insisted on turning my forehead and hands blue when I put it on. I finally scrapped my idea for it and just did my hair in a kind of rolled ponytail tucked thingy. No pictures because it wasn't awesome and I didn't feel right about myself. I mean, I had a good time anyway, but next time I need to give myself more time for Plan B Hair, I guess.
But what had I planned to do with the blue wig? Well. I was thinking it could look sort of ocean-like, wavy and blue, right, and then I'd use a tiny wig I had to make an octopus to put on top like a bun.

I had the idea in my head, but I wasn't sure if it would work. Then I saw this picture online and was like Yes, I can do that!
So I took my little wig and dyed it fuschia, and a wooden spool seemed about right, with two buttons, to make octopus eyes.
The plan was going along just fine. It might not have looked exactly like the picture, thanks to my nascent hair styling skills, but it would have been all right, I think. But there was no dealing with the blue forehead and hands, not to mention it would probably transfer to my clothing and anything I leaned against (like Dave's shoulder) and oh, my neck and shoulders, too. Here's my start to an octopus, though. I've got his eyes set wrong, like a cat's. Oh well.
He looks kind of flat, compared to the inspiration picture. Well, this is how we create. Not everything works out.
So that was Steamposium and we had a great time and I ate too many gummi peach candies and Dave got invited to pose for a steampunk calendar and they'll be in touch. I was not invited to be in the calendar. I blame this on my lack of hairstyling skills and not having a fancy mustache like Dave does. So I guess I'm okay with that. Lip hair is just more hair to style, argh.
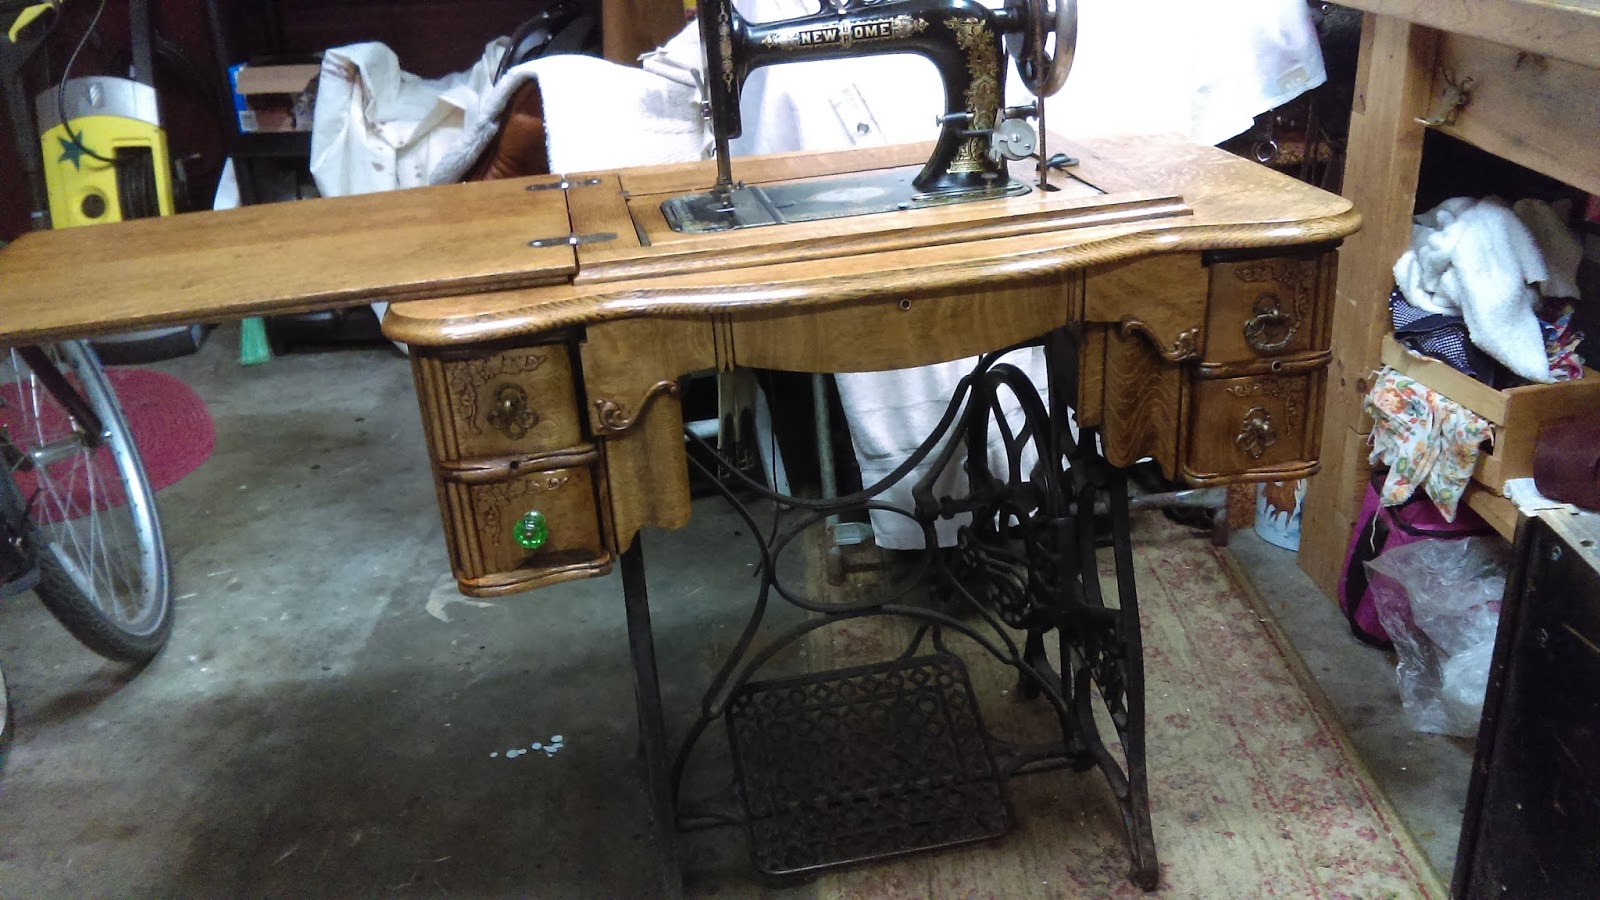
In other news, I finished -- or re-finished, as the case may be-- my treadle machine. The machine head is clean, and the cabinet is clean, with the old finish removed, and a new tung-oil finish rubbed in. She looks a treat!
I was going to replace the knobs, as two are missing the ring pulls and one doesn't match at all, but then I decided they were part of her history and needed to stay with her.
Shoot, I just looked at the time and I'm making myself late for work! I'll be back soon to tell you more about what I've been up to.
Friday, September 16, 2016
Wigged out!
I spent my girlhood wearing holes in my Toughskins, not learning about hairdos, so I'm at a distinct disadvantage when it comes to making myself look fancy with curls and braids and those fluffy French-sounding hair roll things.
I once had my hair professionally worked into an updo for a wedding. I was more bobby-pin than hair when I left that shop. My simple-looking updo was actually a framework of pins strategically placed and a thick coating of hairspray to hold everything in place. I dripped hairpins all night and I still managed to pull another 84 out of my hair that night back at the hotel. My hair is straight and fine and by golly, that's how it wants to stay!
But you guys, Steamposium is coming up.
Seattle's big steampunk event, host to just oodles of people who've lost hold of the handbrake on elaborate Victorian-esque fashion, with frills and ribbons and tulle, feathers and sequins and spangles -- outfits carefully constructed for maximum visual impact. And the hairstyles! Heaped up curls and all those other hair words I don't know because I was a tomboy. It's impressive to see!
And I have my day outfit, and it includes a terrific hat (and you will see it in another post so I'm not going to talk about it here except for this once) so I don't have to worry about doing anything dramatic with my hair. Ponytail or bun at the back, hat on, done.
But at night, there's the Masquerade Ball. And I wouldn't usually attend because it's so not my thing, dancing. But I found this great dress (which will be another part of that future post so I'm not gonna tell you more about it, either, except for this one thing) for $15 at thrift, and one thing led to another and suddenly I have to make difficult choices about the top of my head.
Adding to the difficulty are my Personal Standards About Steampunk Outfits:
1. No useless gears and cogs
2. No corsets
3. No goggles
4. No fascinators (those wee little tophats or bits of fluff that end up on women's heads as decoration)
Why? Because everyone has those things. They are ubiquitous and typical and show a tremendous lack of imagination.
But because I shun miniature hats, and I lack basic hairstyle skills, my fine, straight hair runs a tremendous risk of ruining the elegant look of my evening attire.
What's all this leading to?
WIGS.
There were bunches on display at the thrift shop (Halloween is coming) and I suddenly realized I could just buy fancy hair. I could get any length I wanted, any style, any color..! So I looked at the wigs and quickly realized that they were crap.
Man am I fussy.
But seriously, they were like twenty dollars and sparse -- there was nothing to them! I knew if I got one, I'd be trailing bits of shed plastic hair and it would look wrong and not at all elegant like I want. Alas!
Then in one of the back bins I found an actual wig, a real one, like you'd buy in stylist shop and it was four dollars. And it was pink, but that didn't scare me.
I didn't get a picture beforehand (of course) but this picture I found online is excruciatingly close.
So I bought it and went home to see how it looked.
Well, awful.
Who looks good in pale pink hair? Super pale waifs like the plastic lady in the picture, I guess -- but not me. I looked ... well, let's not linger. It just wasn't a good look on me. Pink, oof. But that's why there's hair dye, my friends! Except a quick internet search assured me that hair dye does not work on wigs (unless they are human hair, which this is not) so I'd have to find another way.
Know what I found? Alcohol ink. Scrapbookers apparently use it for ... something. It comes in brilliant shades, works fast, and stains like the dickens! And I found an online tutorial that showed how you could put it all in a ziploc bag and squish it up. So that looked nice and tidy and doable, and let's not lie -- fun.
I bought a three pack of colors from Ranger/Adirondack Inks because it's what I could find, and used the one called "Stream" which is a nice ocean-y looking blue (which is important, but you'll find out why later on). I put the whole dang bottle of it (half an ounce!) into a plastic bag with maybe a quarter cup of water, tossed in the pink wing, and got to squishing.
See how none of it is on my hands? See how my utility sink is still marbled grey and white? Yeah. That won't last.
In the tutorial, they advise leaving it for what, five or ten minutes? I let this thing stew for half an hour, squeezing and squashing it every few minutes to make sure everything was getting dye to it.
Results! The whole thing doesn't look terrible, and I don't mind the variations in tone, but I'd like the color overall to be more vivid. So tomorrow I'll go buy another bottle of ink and spray it on, full strength. Then I can style it and add the decoration -- which will be in that upcoming post I keep promising -- and if everything goes according to plan, I'll have a terrific hairdo for the ball!
Stay tuned!
I once had my hair professionally worked into an updo for a wedding. I was more bobby-pin than hair when I left that shop. My simple-looking updo was actually a framework of pins strategically placed and a thick coating of hairspray to hold everything in place. I dripped hairpins all night and I still managed to pull another 84 out of my hair that night back at the hotel. My hair is straight and fine and by golly, that's how it wants to stay!
But you guys, Steamposium is coming up.
Seattle's big steampunk event, host to just oodles of people who've lost hold of the handbrake on elaborate Victorian-esque fashion, with frills and ribbons and tulle, feathers and sequins and spangles -- outfits carefully constructed for maximum visual impact. And the hairstyles! Heaped up curls and all those other hair words I don't know because I was a tomboy. It's impressive to see!
And I have my day outfit, and it includes a terrific hat (and you will see it in another post so I'm not going to talk about it here except for this once) so I don't have to worry about doing anything dramatic with my hair. Ponytail or bun at the back, hat on, done.
But at night, there's the Masquerade Ball. And I wouldn't usually attend because it's so not my thing, dancing. But I found this great dress (which will be another part of that future post so I'm not gonna tell you more about it, either, except for this one thing) for $15 at thrift, and one thing led to another and suddenly I have to make difficult choices about the top of my head.
Adding to the difficulty are my Personal Standards About Steampunk Outfits:
1. No useless gears and cogs
2. No corsets
3. No goggles
4. No fascinators (those wee little tophats or bits of fluff that end up on women's heads as decoration)
Why? Because everyone has those things. They are ubiquitous and typical and show a tremendous lack of imagination.
But because I shun miniature hats, and I lack basic hairstyle skills, my fine, straight hair runs a tremendous risk of ruining the elegant look of my evening attire.
What's all this leading to?
WIGS.
There were bunches on display at the thrift shop (Halloween is coming) and I suddenly realized I could just buy fancy hair. I could get any length I wanted, any style, any color..! So I looked at the wigs and quickly realized that they were crap.
Man am I fussy.
But seriously, they were like twenty dollars and sparse -- there was nothing to them! I knew if I got one, I'd be trailing bits of shed plastic hair and it would look wrong and not at all elegant like I want. Alas!
Then in one of the back bins I found an actual wig, a real one, like you'd buy in stylist shop and it was four dollars. And it was pink, but that didn't scare me.
I didn't get a picture beforehand (of course) but this picture I found online is excruciatingly close.
So I bought it and went home to see how it looked.
Well, awful.
Who looks good in pale pink hair? Super pale waifs like the plastic lady in the picture, I guess -- but not me. I looked ... well, let's not linger. It just wasn't a good look on me. Pink, oof. But that's why there's hair dye, my friends! Except a quick internet search assured me that hair dye does not work on wigs (unless they are human hair, which this is not) so I'd have to find another way.
Know what I found? Alcohol ink. Scrapbookers apparently use it for ... something. It comes in brilliant shades, works fast, and stains like the dickens! And I found an online tutorial that showed how you could put it all in a ziploc bag and squish it up. So that looked nice and tidy and doable, and let's not lie -- fun.
I bought a three pack of colors from Ranger/Adirondack Inks because it's what I could find, and used the one called "Stream" which is a nice ocean-y looking blue (which is important, but you'll find out why later on). I put the whole dang bottle of it (half an ounce!) into a plastic bag with maybe a quarter cup of water, tossed in the pink wing, and got to squishing.
See how none of it is on my hands? See how my utility sink is still marbled grey and white? Yeah. That won't last.
In the tutorial, they advise leaving it for what, five or ten minutes? I let this thing stew for half an hour, squeezing and squashing it every few minutes to make sure everything was getting dye to it.
Results! The whole thing doesn't look terrible, and I don't mind the variations in tone, but I'd like the color overall to be more vivid. So tomorrow I'll go buy another bottle of ink and spray it on, full strength. Then I can style it and add the decoration -- which will be in that upcoming post I keep promising -- and if everything goes according to plan, I'll have a terrific hairdo for the ball!
Stay tuned!
Wednesday, August 24, 2016
Julia's Cabinet
The machine has been renamed "Julia" after it's original owner. This is the sort of thing you can do when you have people at the estate sale that can give further provenance when you go back and pester them.
A lot of folks online at various treadle collector sites recommend using Howard's Restor-A-Finish to give an old wood cabinet a boost. The claim is that the stuff is a mild solvent and it softens the finish so it will spread around and fill in cracks, take out water rings, dullness, etc , and maybe on something less damaged, it does that. I got some at the hardware store and gave it a try, but the results were disappointing. Actually, I didn't see any difference at all. I'm sure I'll find a use for it eventually so it's going into my paint stash for now. Then it was back to the shop for some stripper specially made for antique finishes.
Gloves and fine steel wool and scrubbing away over a century of dirty, discolored, cracked and crazed shellac-- this is what I call a good time! I love doing a project where the improvement is so quick and obvious, with a great result.
So, just as a reminder: here's the sewing cabinet top before...
And here it is after stripping.
It's so light! Along the left edge of the top piece, the veneer has been damaged and chunks are missing, so it looks a kind of rough. I've read that filling it in with Plastic Wood or a similar product works, but I can't believe it would look nice. I'm thinking I'll just sand down the rough patch and leave it at that. At 144 years of age, she's going to have some scars and around here we call that authenticity. And see in the lower right hand corner there, there's a dotty discolored ring? It won't come up with stripper. I'm not sure what it's from, but all I know is, that's where I'd set a cup of coffee while sewing. Heat damage? Perhaps.
I'm itching to rub some oil into the clean wood, but I'm holding off until I get the whole thing stripped. One thing at a time! Originally, I planned to just do the top and sewing surface, but the results are so dramatically lighter that it would look very strange, so it looks like I'm going forward with the whole piece.
Light top, dark body. See? It would be weird. But I'm excited to see the beauty emerge, so it will be worth the extra work.
That carving is beautiful! It's hard to get in all the nooks and crannies to get all the old finish off, so I'm just doing the best I can with a toothbrush and my steel wool and leaving whatever is stubbornly resistant. The shellac comes up, but the darker color stays, and I"m okay with that. It adds dimension, and also 144 years, authenticity, etc.
Okay, I gotta head to work. Stay tuned in the following weeks to see more of Julia and her cabinet. Then the sewing projects start!
A lot of folks online at various treadle collector sites recommend using Howard's Restor-A-Finish to give an old wood cabinet a boost. The claim is that the stuff is a mild solvent and it softens the finish so it will spread around and fill in cracks, take out water rings, dullness, etc , and maybe on something less damaged, it does that. I got some at the hardware store and gave it a try, but the results were disappointing. Actually, I didn't see any difference at all. I'm sure I'll find a use for it eventually so it's going into my paint stash for now. Then it was back to the shop for some stripper specially made for antique finishes.
Gloves and fine steel wool and scrubbing away over a century of dirty, discolored, cracked and crazed shellac-- this is what I call a good time! I love doing a project where the improvement is so quick and obvious, with a great result.
So, just as a reminder: here's the sewing cabinet top before...
And here it is after stripping.
It's so light! Along the left edge of the top piece, the veneer has been damaged and chunks are missing, so it looks a kind of rough. I've read that filling it in with Plastic Wood or a similar product works, but I can't believe it would look nice. I'm thinking I'll just sand down the rough patch and leave it at that. At 144 years of age, she's going to have some scars and around here we call that authenticity. And see in the lower right hand corner there, there's a dotty discolored ring? It won't come up with stripper. I'm not sure what it's from, but all I know is, that's where I'd set a cup of coffee while sewing. Heat damage? Perhaps.
I'm itching to rub some oil into the clean wood, but I'm holding off until I get the whole thing stripped. One thing at a time! Originally, I planned to just do the top and sewing surface, but the results are so dramatically lighter that it would look very strange, so it looks like I'm going forward with the whole piece.
Light top, dark body. See? It would be weird. But I'm excited to see the beauty emerge, so it will be worth the extra work.
Side of one of the drawers. This is what I mean by a "cracked and crazed" finish. Some restorers call this "alligator skin". After years of the wood expanding and contracting in heat and cold and damp conditions, the shellac breaks up. In some places, it flakes off if you rub it. Yeah, I couldn't leave her like this.
That carving is beautiful! It's hard to get in all the nooks and crannies to get all the old finish off, so I'm just doing the best I can with a toothbrush and my steel wool and leaving whatever is stubbornly resistant. The shellac comes up, but the darker color stays, and I"m okay with that. It adds dimension, and also 144 years, authenticity, etc.
Okay, I gotta head to work. Stay tuned in the following weeks to see more of Julia and her cabinet. Then the sewing projects start!
Sunday, August 21, 2016
Treadle Machine Magic!
I love a good estate sale, and I'm even happier when it takes place in a house that I've always been curious to see the inside of. Our next door neighbor has been living in her home since the 1930s, and recently she decided to live with her daughter, so they held a huge estate sale and I got to go into the house and snoop around. It was a cute place, and nothing had been updated since forever, unfortunate decorating decisions and all. Coved doorways. Tall baseboards. Flocked wallpaper in pale blue. And the tiniest rooms ever. It was like a little playhouse, but for living in. I wanted to buy it and make it my new fort. As it's right next door, it couldn't be handier, and then all my sewing stuff and horse things would be out of Dave's way. I told Dave we should buy it and join the two houses with a breezeway, but he said no. So much for my architectural plans. Alas!
But there was one thing I wanted for my own, so I did a little bargaining and came away with this little beauty. I call her Julia after her original owner. Julia is a New Home treadle sewing machine, and according to her serial number plate, she was built in 1882. She's seen some serious use, but she has been reasonably maintained and still runs very nicely.
She needs a serious clean. There is a grimy layer of oil, dust, and dirt on her that has built up over the years. Some things get dirty from being handled and used, and some get dirty from sitting and attracting dust. Julia has both in spades. Today is her spa day.
I've removed her from her cabinet. She's resting on an old bathroom rug with a shower curtain over it to catch drips. I'm using a cleaner that gently melts away grime and oil but won't harm the decal decorations or finish. What is this amazing substance? Gojo. It's a hand cleaner used by mechanics, but after seeing how well it works here, I'm going to be using it a lot more on parts and stuff. (If you buy some, be sure you get the kind without pumice.) EDIT: I've since learned that Gojo sometimes will damage the gold parts of the decals, leaving them silver-ish. A better cleaning recommendation is to use sewing machine oil to soften and lift grime. It won't damage anything.)
So here are Julia's before pictures.
I thought the floral scrollwork had mostly worn off, and that's why it was only dimly visible.
I applied the Gojo with a one-inch paintbrush and let it sit for about twenty minutes. The stuff starts out as kind of a wobbly, custard-like cream but after it's applied, it melts like butter. In the areas where the grime was thickest, it would turn brown and puddle up. I'd wipe the goo away with a towel and reapply fresh Gojo. If a spot was particularly grungy, I'd gently scrub at it with a soft toothbrush. Here's Julia all gooped up with Gojo.
Turns out the decal decorations weren't that worn at all (except in the stitching area, where they'd seen the most wear during sewing), and the Gojo melted away the grim to reveal beautiful colors and swirls I had no idea were there!

Look at her! Isn't she pretty? In some spots, especially near the little holes where you oil the works, there was a darker patina, and I decided to leave that rather than try to scrub it away with anything stronger and possibly damage the decals. After all, we can't expect her to look brand new at 144 years old.

Now that the machine itself is all clean, I'll re-oil it and set it aside while I work on the cabinet. That's going to be another post, so you can look forward to that, but here's a picture of what we're starting off with. Yup, it's pretty rough. But I'm hoping there's going to be a dandy "after" picture when I'm done!
Wednesday, August 17, 2016
Buckaroo Stuff
My riding has taken a classic turn lately. I am working to train my horse (with the help of a very experienced teacher) to be a finished bridle horse. This takes careful handling, lots of work, a good amount of time, and also rekindles long-ago ten-year-old me's fantasies of becoming a cowboy.
And if you're going to take the ride, you gotta have the look, right?
First stop, the shirt. I got a pattern on sale a while back, and I was delighted to find it in my stash. Buckaroo Bobbins, by Simplicity, with a pattern for a shirt, vest, and coat. Don't care about the coat, but the shirt and vest were just what I wanted. Plus I'd found three yards of natural-tone shirt weight linen at the thrift shop for three bucks that would be perfect to make it.
It's an easy pattern: front, back, two sleeves, cuffs, yoke, and collar. I hand stitched it, of course, so it took a few nights with the buttonholes being a cussing struggle as always. I really should practice those more often so I get good at them. As it is, I'm glad they're mostly hidden by the buttons. Hand sewing a project when the instructions are written for machine sewing is always a bit of a trick. The plan for attaching the neck and collar was very convoluted. I was able to do it, but the whole time I was thinking how I'd do it differently next time and it would be much easier. I got a small jar of buttons at thrift for two bucks that was a real bargain because they were old and made from natural shell, not plastic. So my shirt has beautiful carved shell buttons that have that warm pearly glow.
The collar points are a little damp because I had made some sewing marks there that had to be dabbed away. I've got some red-brown wool that's going to be the vest, but I haven't started that yet.
While digging through the patterns, I found one for gloves and thought I'd give that a shot. I had some scraps of pigskin I could use, so I cut out the pieces and set to work with a special leather gloving needle and some sinew. I used a fancy stitch to make it especially cool, and while it turned out, it was so much work that I decided I'd not make the other one. I may try again sometimes with a thinner leather to make a dress glove instead of a heavy work one, but dang, that's just a lot of hard pushing with the needle, and store-bought gloves are not that expensive.


I bought some new spurs for myself and decided that some fancy straps were in order. I chose a style called "dovewing" that looked attractive, and designed a stamping pattern similar to a pair of straps made in Miles City back in the 1800s. Here's my trial one after being cut and stamped, but not dyed yet. The size was fine, but after trying it on, I decided I didn't like the shape as much as I thought I would.
So I made some more traditional buckle straps that were narrower, and still managed to incorporate the flower design in the center. Here they are, all done. I wore them riding that night and felt pretty sharp.

So you can see I'm still busy as ever, making stuff. I'm just not so likely to be at the computer writing about it! And now I gotta head to work, and there's two horses waiting for me to ride them tonight, so I'll see y'all later. Happy Trails!
And if you're going to take the ride, you gotta have the look, right?
First stop, the shirt. I got a pattern on sale a while back, and I was delighted to find it in my stash. Buckaroo Bobbins, by Simplicity, with a pattern for a shirt, vest, and coat. Don't care about the coat, but the shirt and vest were just what I wanted. Plus I'd found three yards of natural-tone shirt weight linen at the thrift shop for three bucks that would be perfect to make it.
It's an easy pattern: front, back, two sleeves, cuffs, yoke, and collar. I hand stitched it, of course, so it took a few nights with the buttonholes being a cussing struggle as always. I really should practice those more often so I get good at them. As it is, I'm glad they're mostly hidden by the buttons. Hand sewing a project when the instructions are written for machine sewing is always a bit of a trick. The plan for attaching the neck and collar was very convoluted. I was able to do it, but the whole time I was thinking how I'd do it differently next time and it would be much easier. I got a small jar of buttons at thrift for two bucks that was a real bargain because they were old and made from natural shell, not plastic. So my shirt has beautiful carved shell buttons that have that warm pearly glow.
The collar points are a little damp because I had made some sewing marks there that had to be dabbed away. I've got some red-brown wool that's going to be the vest, but I haven't started that yet.
While digging through the patterns, I found one for gloves and thought I'd give that a shot. I had some scraps of pigskin I could use, so I cut out the pieces and set to work with a special leather gloving needle and some sinew. I used a fancy stitch to make it especially cool, and while it turned out, it was so much work that I decided I'd not make the other one. I may try again sometimes with a thinner leather to make a dress glove instead of a heavy work one, but dang, that's just a lot of hard pushing with the needle, and store-bought gloves are not that expensive.


I bought some new spurs for myself and decided that some fancy straps were in order. I chose a style called "dovewing" that looked attractive, and designed a stamping pattern similar to a pair of straps made in Miles City back in the 1800s. Here's my trial one after being cut and stamped, but not dyed yet. The size was fine, but after trying it on, I decided I didn't like the shape as much as I thought I would.
So I made some more traditional buckle straps that were narrower, and still managed to incorporate the flower design in the center. Here they are, all done. I wore them riding that night and felt pretty sharp.

So you can see I'm still busy as ever, making stuff. I'm just not so likely to be at the computer writing about it! And now I gotta head to work, and there's two horses waiting for me to ride them tonight, so I'll see y'all later. Happy Trails!
Subscribe to:
Posts (Atom)