Friday, June 28, 2013

Josie's Job

When Dave and I get all dressed up in our finery and go to engage in medieval what-nots, Josie (our lab-pointer mix) always watches us leave with a look that I cannot help but feel is a vague sadness at being left out. I try to make her feel important by commanding her to watch the house and keep the cat under control, but we both know all she does is nap and bark at birds in the backyard. 

Well, no more. Josie is being trained for a very important job: carting! In the early days, dogs often were used as burden animals. They were cheaper and easier to keep than a horse and also could perform the duties of watchdog and hunting. 

I cut her harness from some 10oz leather I bought a few weeks ago from the Oregon Leather Company. I got a large piece from the remnant bin and it was the perfect stuff for this. Scraps of shearling fleece I had left over from re-doing a saddle padded the leather for comfort, and I used a bit of red leather to make the family crest to adorn her breastcollar. She very happily stood for all the trying on and measuring -- probably because I had a handful of treats. Everything about this project, from start to finish, has to be pleasant for Josie to make her a willing and cheerful carting partner. 


Here's the finished harness. It looks a little low because of the angle of the picture, but I assure you it's fine. 


Our family crest -- alternately called the Boar's Head or the Almighty Boar, depending on how long I've been talking -- is highlighted with just a touch of gold on the pineapple-ring halo. I am a wit.


There are steps to teaching a dog to cart. After two walks and a play session with the harness on, we went to the next step: I attached a bucket to the harness to drag behind her and make a little noise. She looked back a few times but was more curious than disturbed, and soon that bucket was bouncing and jostling along behind her and she didn't even care.  I'd told myself I'd wait a day, but she was doing so well I couldn't resist and we went to the next step: getting her used to the idea of shafts at her sides. I attached two brooms to her  through the shaft loops and her tail never stopped wagging. (You can see it's all blurry in the picture!)  It's very clear to me that Josie is going to be an excellent carting dog. Now I'd better hurry up and make the cart!

 
I found this site to be a useful resource for measurements and training ideas. It's a great starting point for anyone interested in medieval dogs. 

Monday, June 24, 2013

I need some advice!

I got five yards of this delicious muted blue-green silk for the ridiculous price of three dollars at a thrift shop. It's not heavy enough to be a dress, but it's the perfect weight for a chemise.

It's more blue-y than the camera makes it look. Silly camera! 

All I need is someone to assure me that colored silk chemises are something that a person -- any person!-- would have worn in the fifteenth century, and I'm a happy girl.

Either that, or give me an idea for something else amazing that I can make with this incredible fabric windfall.

Anyone?

Sunday, June 23, 2013

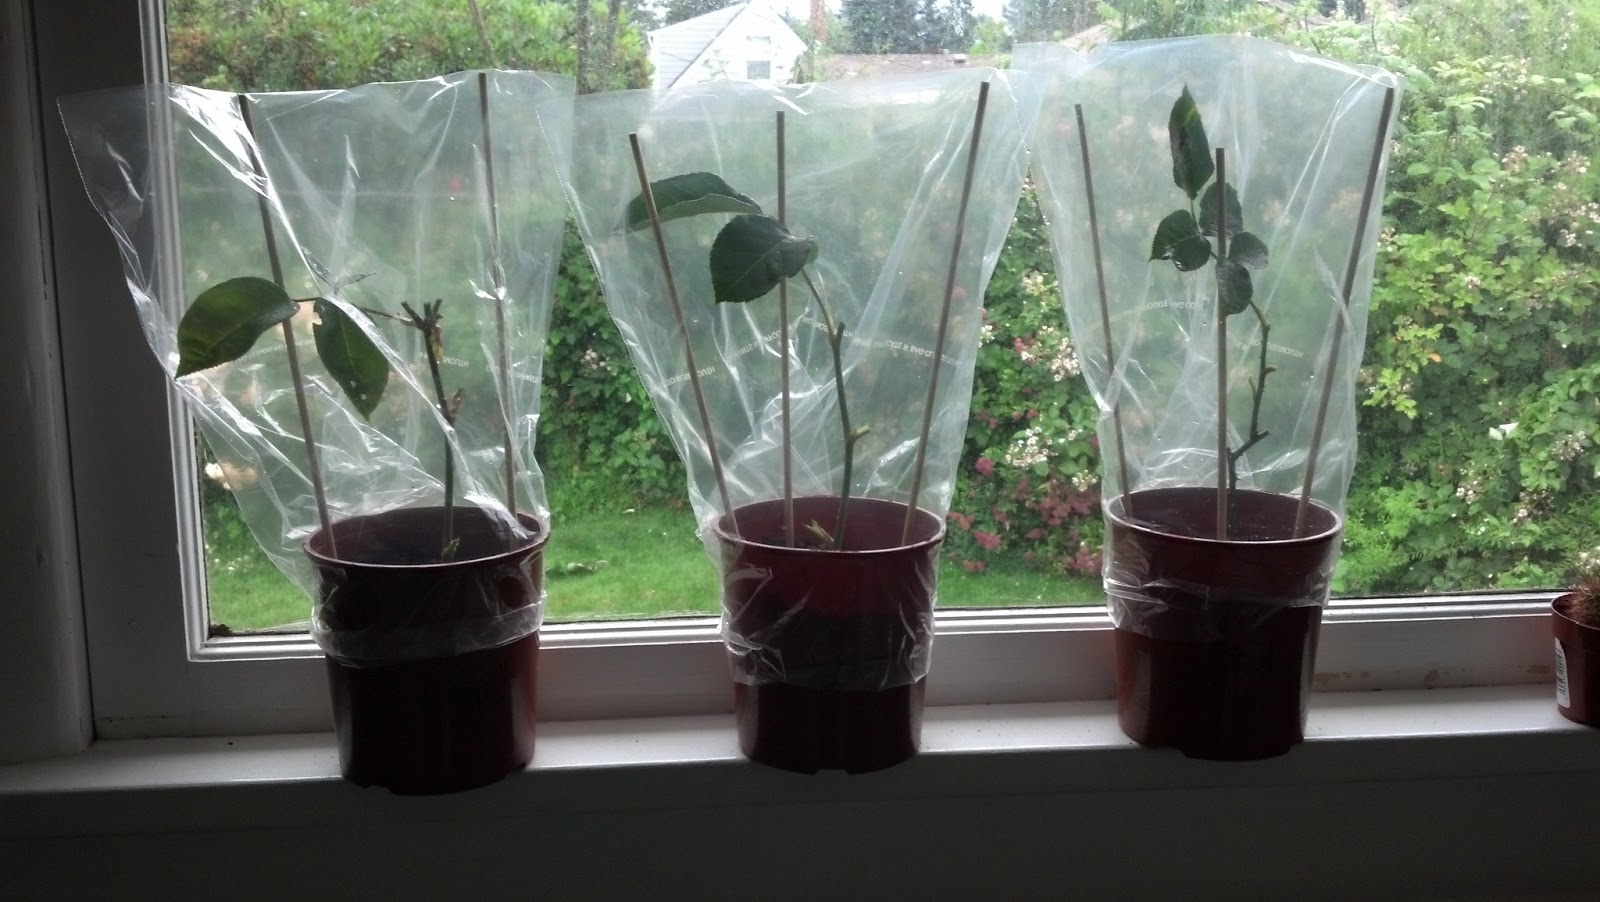
Stand back; I'm going to SCIENCE.

Experiment: propagating roses from cuttings.

One red (cut surreptitiously from the neighbors' coveted bush by the fence), one pink (a climber from my front yard with a good history of fortitude), and one yellow (my favorite producer from our driveway-side garden) all clipped according to the Pacific Rose Society's online instructions, dipped in RooTone, settled into potting soil/vermiculite mix, misted and bagged. Bathroom windowsill provides bright indirect daylight. If even one manages to survive, I shall call this a success.

It's not really the right time of year for this and indoor plants have a sad habit of failing under my care, but I've astounded myself before. It's so crazy, it just ... might... work.

If I never speak of it again, assume complete failure. Otherwise, stay tuned for progress pictures and self-congratulation.


Friday, June 14, 2013

Not very footloose, after all.

I took more pictures this time, guys! Now you can see all the struggling and woe that goes into making turnshoes. I promise not to share pictures of the bloody knuckle where the skin wore off from rubbing against the insole as I set my stitches. Consider yourself lucky. I know professional leather workers have special pads and protectors they wear on their fingers for various jobs, and now I know why. If I were going to be making a regular production of these I might look into that, but  as it's just one pair (and all the experiments that lead to those), bandages and duct tape will suffice. 


So here are the pieces, all cut out. I bought my leather from the scrap bin at the tack store and the two pieces I found that were big enough, while being the same leather, were from different places on the cow and so the dye was a little uneven. This picture makes the difference look a lot more pronounced than it actually is under natural light. And once I get them worn and scuffed, who's going to notice?


I wanted to sign my work, so I stamped this tiny leafy sprig onto the edge where the laces will go. It's only half an inch long and won't be terribly noticeable.


The stitching begins! I start at the toe so I know it will meet up correctly. I stitch down the short side, and then do the longer side. I tried pre-punching stitching holes in the sole, but it really didn't seem to make that much difference, so I gave it up. Later I pre-punched holes in the upper leather, and the difference was negligible, at least to me. Using the stitching awl gives me quite a bit of stitching strength. If I were going to sew with a needle alone, then punching the holes beforehand would be necessary.

Blurry one-handed shot of me stitching the heel. Almost done! Please notice my heavy duty workshop apron. It was a gift from Dave on my birthday, and I just love it. I feel like Mister Rogers when I come into my shop, take off my jacket, and put on my apron for work.


Turning the shoe after stitching was the hardest part. It took me about half an hour of struggling! I wet the leather to soften it, which made things easier, but it was still real work. I was certain that at any moment the stitching would tear somewhere and ruin everything. If you get leather wet, the oils and conditioners that were part of the tanning process will dry out along with the water. They must be replaced or you'll end up with a hard, stiff shoe that will crack and tear more easily. I used Lexol leather conditioner after turning to keep my leather soft and supple. (The toe is still damp in this pic, that's why it looks darker.)


There were some problems. The toe box is still very tight, and I think that I made the sole too narrow there. My mother sent me an email which said in part: "Way back when I was in high school the most in style shoe was a Capezio flat. That company also made ballet shoes. The thing was that when you bought them they had to hurt. The leather was very soft and within days of wearing they shaped to the foot and were very comfortable. So, my advice is this: Don't make the toe area bigger. If your leather is soft it will conform to your foot. Making it bigger may in the end end up being too big."

She's right, to an extent. If it were just tightness, I'd wear them a bit, maybe stuff some cloth into the toes, and see if the leather would work with me to get comfortable. But the problem is that the sole edge is under my foot, and when I walk, the leather upper comes in contact with the ground. That area will wear out more quickly as the softer leather is abraded.

Good heavens, my stitching looks terrible! This is another reason I want to try again.
Another problem was that I'd sewn the left upper to the right sole. The lacing opening was on the outside of my foot. This also made the upper twist to the inside, for some reason, and made the whole shoe feel strange on my foot. I cut a slit on the inside to see if that made a difference, and it did --as well as making the shoe easier to put on -- and I also widened the... the... the opening where the foot goes in. I've looked all over Google and can't find the term for that part of the shoe! 


Every time I try the shoe on, it feels a little better. I can see where there will be stretching, and the adjustments I've made have improved the fit. Already I'd say it's an impressive first attempt, and I'm thinking I'll take this one apart now that I've amended it on my foot, and use it to make my final pattern.  Here's one last picture of the project, on my foot, laces added. I think it's pretty darn cute -- now if it would just stop pinching my toes!


Thursday, June 13, 2013

Scribbles.

Kids. Even centuries ago, long before crayons or sketchpads, they doodled and scrawled pictures of life around them -- even in school, when they should have been studying. Case in point: Onfim, a seven year old boy with a fondness for covering his writing lessons with portraits of horses, his family, and his friends.  Check out the link and enjoy!


Wednesday, June 12, 2013

Something's afoot!

Recent leatherworking experiments have rekindled my interest in historical clothing.  Turnshoes look pretty easy. I can stitch up a pair of shoes, I'm sure! To the workshop!

First I need a pattern. The internet seems to generally agree that Marc Carlson is the go-to guy for the sort of information I need. His "designs" are not patterns, per se, in that they are not drawn to scale, but they're an excellent jumping-off point. I decide to go with his side-laced shoe as a starting pattern, and make my own amendments (if needed )as I go.  I had seen pictures of handmade shoes that looked like fat leather bags tied onto feet, and I wanted to avoid that look. Many prototypes and experiments might be needed!

The sole. I put my foot on a piece of heavy paper and traced around it. I kept the pencil parallel to my foot and ended up with a very wide sole. I took a piece of heavy linen and fit it around my foot, tucking it under the leather sole I cut, to get an idea of the effect. There it was: the fat leather bag I was hoping to avoid! So that's my first tip: cut the sole in a bit under your foot's arch. Here's a pic of the sole's transformation.


The upper. Feet are very individual things. I knew just cutting out a standard pattern and hoping for the best would probably not get me the kind of results I wanted. Most websites I visited suggested putting on an old sock and covering your foot with duct tape to make a pattern. Some had very complicated pattern-making regimens involving string and math. I know that a foot in the air, crossed over one's knee while being taped, is a very different shape than a foot flat on the ground, not to mention the angle of the ankle. What worked for me was standing up and then shaping tinfoil over my foot. I drew lines with a marker to show my foot's centerline, the highest point of my arch, and where the edges should be. I flattened it out slightly, and there was my basic pattern.

I cut it out of heavy canvas and taped it to the sole I'd made.  Gently slipping it onto my foot, I found it was still too wide across my toes. I marked the sole and pattern accordingly, changed the lacing opening to the inside of my foot rather than the outside (easier to fasten!) and went to cut my pattern out of test leather.


The green leather I chose is a little lighter weight than I wanted, but I had a big piece of it and it was kind of shabby and dirty, so I didn't mind using it for experiments. Once I started stitching, I realized it was so dry that I could tear it with my hands. Definitely not good for shoes, but fine for trying things out.  

I used a stitching awl and heavy waxed thread. If you've never seen one, here's the exact one I have. They're inexpensive but work a treat once you get the hang of it.


I used the curved needle and did a edge-flesh stitch, which is where you go at an angle, coming out the side of the sole leather, rather than punching straight through. This brings the seam edge off the ground and prevents the seam from wearing through very quickly. I was excited about my work and forgot to take a picture. Here's the idea. (I stole the pic from the forums at Dagorhir.)


After an hour of stitching, a few swears, and wearing a blister onto one of my fingers that constantly rubbed against the rough side of the sole, I had made this: 


 And the bottom. 


And on my foot. Don't mind the athletic sock! 

It's the tiniest bit snug through the toes, so I'm going to add maybe a quarter of an inch there when I make my final shoes.  I picked up some reddish leather that will be perfect, so stay tuned and in a few days (hopefully) I'll post pictures of my cute new shoes!

Saturday, June 8, 2013

Jag talar inte bra svenska.

I found a new blog to enjoy the other day, and I just have to share it with you all. It's called "In Deme Jare Cristi". Beautiful handwoven cloth and handstitched clothing; it's really delightful. Please go take a look!

It seems a lot of the medieval reenactment blogs I find are from Nordic people. I follow Historisk Garderob and Renikas anachronistic adventures, which are both Swedish, there's Hibernaatiopesäke, which is Finnish, and and I notice that my "Feedjit" sidebar that tracks my visitors here is often full of Swedish, Norwegian, Danish, and Finnish flags.

And all these talented ladies write their blogs with English either as the main language or in addition to their own national language. Perhaps they're just using a translation application like Google Translate, but I remember my family had a Finnish exchange student living with us for my senior year of high school and his English was perfect (with a slight accent that was quite attractive!). He led us to understand that having English as a second language was not unusual in Finland.

Now, I have taken five years of high school and college German, a semester of French, self-studied Italian for a few months, taught myself Ancient Homeric Greek for two years, and went through a phase where I listened and repeated along with a Teach Yourself Swedish cassette in the car for about a year.  I suppose German was the closest I ever came to being somewhat fluent in another language, but that was over 20 years ago and it's very rusty now. Greek was the most intense, and I can read (or sound out) words but my translation skills are not terrific and as for speaking, well... not so much. The Swedish I have retained consists mostly of asking to go to the movies and the usual polite standards: please, thanks, hello, etc. As Dave says, it's just enough to make me very irritating at Ikea.  

I can't imagine writing my blog in anything other than English, though I would love to be as accommodating to my Nordic guests as they are to me and the rest of the English-speaking world. So let's try this...


Tack för att du besöker min sida och titta på de saker jag gör. Jag uppskattar ditt intresse och det gläder mig att i denna värld där vi bor så långt ifrån varandra, kan vi fortfarande gå samman för att dela kreativ tid tillsammans. Vänligen kom tillbaka igen och se vad jag har varit upp till, och om du har en blogg där du delar dina kreativa idéer, gärna länka till den i kommentarerna i detta inlägg!


Takk for at du besøker min side og ser på de tingene jeg gjør. Jeg setter pris på din interesse og det gleder meg at i denne verden hvor vi bor så langt fra hverandre, kan vi fortsatt gå sammen for å dele kreativ tid sammen. Vennligst komme tilbake igjen og se hva jeg har vært opp til, og hvis du har en blogg hvor du deler dine kreative ideer, gjerne linke til det i kommentarfeltet i dette innlegget!


Kiitos kun tulit sivulle ja katsot asioita teen. Arvostan kiinnostusta ja se miellyttää minua, että tässä maailmassa, jossa elämme niin kaukana toisistaan​​, voimme silti liittyä yhteen jakamaan luovaa aikaa yhdessä. Tule takaisin ja katso, mitä olen puuhaillut, ja jos sinulla on blogi, jossa voit jakaa luovia ideoita, vapaasti linkittää se kommentteja osassa tämä viesti!