Sunday, February 8, 2015

Tack Repair Takes Off

You've all seen my saddle restoration projects and the horse-y this-n-thats that I've made now and then. But now, after a year or so of mentioning it consistently to friends, I'm finally starting to get a small reputation with my skills. My friend Paige has been really good about handing me awful stuff, usually with a line like "I'm just going to throw this away if you can't fix it, so..." Case in point, this braided rawhide noseband: 


The braiding on the noseband itself is so fine that I thought at first it was a piece of cotton rope. The individual strips it's braided from are less than a millimeter wide. It's a piece of art showing extreme skill in construction. Unfortunately, a bad horse got ahold of it and chewed it up. The leather headstall was dirty, dry, and mangled. I cut and tied a new one from latigo leather, and wrapped some thin sinew around the noseband where it was ragged. The color matched, and as the leather strap went over that spot, the mend was not very noticeable. A little saddle soap and conditioner later, and we have piece that's ready to get back to work.


"Okay," says Paige, "You think you're so smart; Here's a leather handbag I've had since the 80's. A puppy chewed up the handle. I've taken it to other places and they say it can't be fixed. Let's see what you can do."

I bought a spool of matching plastic lace for three bucks (Yes, the original used plastic lace, not leather.) and pulled out a booklet I'd photocopied ages ago about leather lacing techniques. The drawings turned out to be difficult for me to figure out, but I found a video on Tandy Leather's site that made it clearer. I used my sinew again, to stitch where the puppy had chewed through, and my stitches were hidden when I worked the lacing over them.


You can see where I started the new stitching, can't you. Me, too. It kinda bugs me now, but it's not bad for the first time ever using a technique. Paige was pleased, and maybe someday I'll get a minute and can work that stitch so it's a little more elegant.


Back to work, handbag! And keep away from those naughty puppies!

So, now I had a new skill to practice, and a spool of plastic lacing to use up. I decided to try my hand at another noseband. Using new leather and hardware from my stash, I worked up this in two nights. (Lacing takes more time than you'd think!) The pattern stamped on the leather is from a stamp I made myself from a nail. You might remember seeing it in my posts about the charro saddle.


Here's a closeup of the noseband, with fancy stamping and that pretty lacework.


Here's the finished noseband, with handstitched keepers and buckles, and a little touch of silver at the sides to make it interesting.


 My beautiful and slightly blurry Imp models for us. (Ignore the tatty green halter around his neck. He really could use a new one, but it has his name on it, and I'm a little sentimental.)

After taking the pictures, I posted the noseband for sale and sold it in five minutes for $25. Not bad for something that I made with stuff I had laying around. The girl that bought it has a palomino. It'll look terrific on him!

Paige had been talking me up to her friends, so I got a call from a woman who wanted me to clean a saddle she wanted to sell. It wasn't a terrific challenge, but it was oil-tanned leather, which I hadn't worked with much before. When I first hit it with the saddle soap, the leather changed color alarmingly, turning from red to a greyish-brown. I was certain I had ruined it -- and as the saddle is worth thousands, you can understand why I panicked a little. But a little rub with neatsfoot oil put it right. *whew!*


Dusty and sad... 


Shiny and happy! 

And then Paige came through again, with another friend who had a bag similar to hers that needed the lacing re-done. This time the lacing was real leather, not plastic, and she had included several yards of the stuff so I didn't need to buy any.  I re-did the entire lacing at the bottom, and the top half of each handle, then cleaned and conditioned the entire bag so it will be good to go for another 33 years. 


Leather is a very satisfying medium to work with. I am constantly pleased with how well it responds to treatment.

That said, I bet you're wondering how my Manuscript Challenge is going. I need to get going on that. I still have the neckline and embroidery on the tunic, and then I start with the armor!  I've got plenty of things coming up to show you.

Sunday, January 25, 2015

Hedgehog!

A short video about the habits of the hedgehog, based on a medieval bestiary in Latin, with English subtitles. You're welcome!


Monday, January 19, 2015

Upgrading my chaps!

I've been longing after a pair of proper chaps ever since I started riding; they're such a very cowgirl thing to have! Unfortunately they are quite expensive, and my usual recourse -- making my own-- is not much cheaper, once the leather is purchased. So of course I've been shopping for them secondhand.

My favorite online thrift store has them all the time, but apparently I'm not the only one looking for a pair. The shipping is usually about $15, which leads me to bid conservatively and I'm usually outbid very quickly. But finally I got this pair of black suede "shotgun" style fringed chaps for a bid of $5.95. With shipping, it was just over twenty bucks. No one else even bid! I wonder why? Oh well, they're mine now.

They were fine as they were: clean and workable, and the fit was good. But I decided it would be quite easy to re-design them a little, make them look more expensive, and personalize them using my leathercraft skills. Some friends of mine recently gifted me with a big piece of tooling leather, so I figured out a pattern based on the original parts, fancied it up a little, and started working.


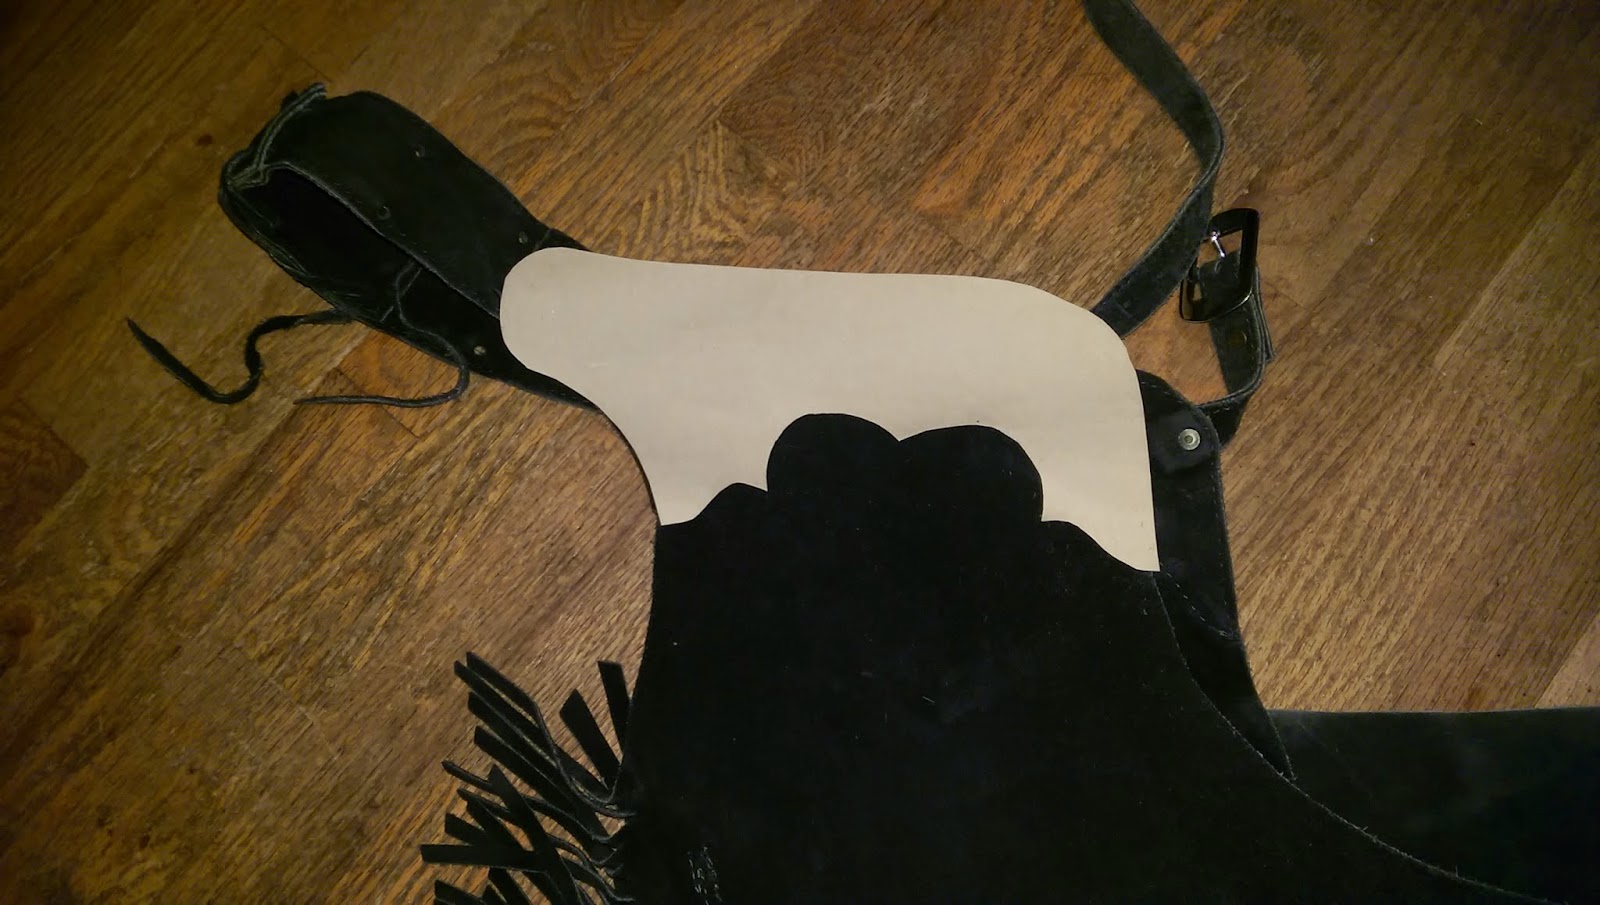
The original yoke and belt. The wide belt goes at the back, and the thinner one buckles in front. Very adjustable, but not very fancy or interesting.


The pattern I made for the yokes, based on the original ones but with a few extra swirls and swoops to make it more eye-catching and, I think, feminine.


The yokes cut from tooling leather. In this pic I've only beveled the edges on the bottom one, and you can compare to see how this slight detail gives the piece a more finished appearance.


This was only the second time I'd ever used my basketweave stamp. It worked up pretty easily once I got the trick of it, and it looks nice!


Basketweave done and the design edge finished with a rainbow-esque cam tool. Looking pretty good. I'm starting to think this will turn out better than I hoped.


Both yoke pieces done. Then I cut a two inch strap for the back belt. I rounded the edges, beveled and stamped it, adding a monogram in the middle to personalize it.


The yoke pieces will be sewn on, and the back belt will attach to them with conchos. This will add for extra adjustment, if needed, as well as looking fancy. (I don't have the conchos yet.)


First coat of dye. It's still damp and a little uneven, but a second coat will fix that. Also, the lighting in the shop and my flash play havoc with the appearance of surfaces. I'm no professional photographer, alas! The color I chose is Lincoln Leather Dye's "Brown". Crazy name!


Glued in place with contact cement. You can see the tiny front belt I made. It's riveted in place, and the stitching on the edge of the leather will hold it even more firmly.


Concho hole punched, and the stitching begins. I have a piece of thick felt to keep the leather from getting scratched by the wooden stitching pony. I used black waxed heavy thread. Stitching leather by hand is slow work for me, but the look and quality is worth it.


Finished! Still need those conchos on the back, but then they go for their first ride on Wednesday.  I've already got ideas of how I want to to do another pair, yikes!

Wednesday, January 14, 2015

insert foot pun here

Hobbit feet are hairy and thick-soled, and therefore hobbits don't wear shoes. Tolkien never said that Hobbit feet were big, except in the case of the Proudfoot family line, but artists have often drawn them with large feet and it's become a bit of an accepted fact.

I was okay with going barefoot to the party until the temperatures took a serious dip into the low 30s (zero Celsius!) , and then I decided I needed something to keep warm. A quick trip to the fabric shop and four dollars later, I had a sizeable piece of beige fleece from the remnant bin. Now, how was I going to make it into suitable feet?

It's the sort of thing that literally keeps me awake at night. I lie there in the dark and mentally fold and pin and stitch and amend until it's three am and I have a plan. I wanted something that looked right but wouldn't take forever to make, because time was short. I searched the internet and found something similar to what I had in mind, so with that idea and my own combined, I came up with this:

To make the pattern, place your bare foot onto paper and draw the shape of your Hobbit foot. I didn't go so much for big as I did long.  Cut two layers for each foot and stitch them all the way around. Yep, all the way.


Now make sure that you have a right and a left foot! Then carefully cut an opening in the top only of each foot, starting about an inch and a half from the heel and about four inches long, and turn the feet inside-out so the seams are hidden inside. Go ahead and stick your feet in them to check the fit. Fleece is nice because there's a lot of stretch and give to it. I cut the openings in mine a little more oval-shaped to give a better fit. All good so far? Okay.  Take the feet off and put a little stuffing in the toes and toe area.

Now you need a pair of socks. I got some mis-matched ones from the lonely sock bin in the laundry room. Put them on, and pull your Hobbit feet on over them. Add stuffing where needed to make a nice foot. I didn't put any underneath my foot or on the sides, just mostly around the toe and front of the foot to make it look right. Smooth out any lumps and when you're happy with how they look, pin (carefully!) the fleece to the ankle of your sock and gently remove your foot, leaving the sock as a lining in the Hobbit foot.

I'm sorry I didn't get pictures of the in-between steps. I get busy and I think I'll do it later, and then.. well.

I used a one-inch strip of fleece stitched around to cover the raw edges of the foot and sock. My husband felt like it was too loose and so I made his binding a little wider and added a strip of elastic in it to help the feet feel more secure. I found hand stitching to be easiest for this part.

A little fake fur stitched on the arch finished my feet. I think they look pretty good!


I didn't put on toenails because I thought they looked creepy. Your mileage may vary.

If I had more time, and this was for a proper cosplay event, I'd have taken more care with sculpting the toes and other details. I would have hand-tufted the foot hair to make it look a little more natural, and I'd have put a leather sole on the bottom for longer wear.  But for a one-time party, I think they'll do nicely!

Oh, and here's a picture of us both in our full Hobbit regalia! What am I looking at? Who knows, haha -- it's not a great snap of me, but as usual, my hubby looks great.


Sunday, December 28, 2014

Further Hobbitses!

As the Hobbit party draws nearer, I realized I wasn't happy with the dark blue pinwale corduroy I had chosen for a cloak. I lined it with red satin and it's pretty, but it hasn't got that hobbit-y feel to it. It's too fancy. Back in the stash closet, I found a moss green wool, and by luck it coordinated beautifully with a jacquard trim I had picked up from the sale bin just a few days before for a dollar! By turning the hem up and covering the raw edge with the ribbon, I saved sewing time and put this together very quickly. 


I made the hood nice and deep, with a tassel on the end. I braided it, but I'm not sure about that, so I might undo it. There is a tiny brass bell tied into the tassel as well, for just a little jingle. Very merry! 


The closure at the neck is made from leather I stamped with acorns and a deer-hoof stamp on the border. I cut two buttons from one of my stash antlers, polished them with a little beeswax, and stitched them on. The leather buttonholes are a bit stiff, so I just slip it on over my head.


Next time I'll post my tutorial on how to make Hobbit feet!


Monday, December 22, 2014

Foxy!

A quickie project, this one was the result of finding just the right soft cozy flannel in the remnants bin at the fabric shop. For 58 cents, I couldn't pass it up -- it was the perfect color to make a little stuffed fox.

No pattern; I just kinda cut what I thought looked right and stitched it by hand while watching Christmas movies on Netflix. Embroidered eyes and nose, and a quickly crocheted sweater, and I was done.


He wasn't made for any particular reason or person, so I asked around my circle of friends and the next day he was off in the mail as a little gift for a friend's baby. I hope he's well-loved and provides lots of comfort and cozies.

Hobbitses!

Finally a little something I can show you, to prove I'm still making things-- but without ruining any holiday gift surprises.

Some friends of ours have recently returned home from a trip to New Zealand, and to mark the occasion (and the holidays) they are throwing a "New Year's Party of Special Magnificence" with a Hobbit theme. We just saw the movie a day or two ago, so I already was percolating with costuming ideas, but then to have this party come up -- well, it didn't take much to fan my enthusiasm into a flame!

New Year's isn't that far off, and I knew I wouldn't have time to cut out a fresh dirndl pattern, not to mention find appropriate fabrics. I wanted to use my stash as much as possible, and keep my spending to a minimum.

My starting point was a tweed vest I picked up at thrift for four dollars. It had a nice English look to it and I knew that pairing it with a skirt would save me having to fit a bodice.

I had a few yards of red wool in my stash (with the thrift price tag still attached: $5.99!) so I cut a simple gored skirt and whipped it up on my machine before dinnertime. I handstitched the hem because I think it looks better than a machined hem.  A hook-and-eye closure on the waistband finished the skirt. It looks great, fits perfectly and is quite flattering. As a nice bonus, it's something I could wear as part of my daily wardrobe.

I dug up a muslin chemise I made back before I even started this blog, shortened the sleeves with some red contrast stitching, and it became the perfect underblouse for my outfit.

The last bit I made was the apron. I used a cut off end from an old gold linen tablecloth. I used the finished edges to save me having to hem, pleated it, and used a bit of red hem facing folded over to finish the top and make the ties. A scrap of jacquard ribbon from my workbasket gave the apron an extra Hobbit-y touch.

So here's what I came up with and made in one night -- that's right, in about five hours!


First draping. I have red linen here for the skirt, but once I started measuring, there wasn't enough to make the skirt as full as I wanted to. The dark blue velveteen is going to be a hooded cloak, but I haven't got that made yet. That's tomorrow's project.


Getting there! The chemise sleeves still need to be cut back and stitched, but you can definitely see where I'm headed.


Done and done. So cheerful, and so comfortable! I just love it, and I know it'll be a big hit at the party. Stay tuned for next time, when I'll show you the cloak and a few other things I've made lately.